Difference between revisions of "Main Page"
| (259 intermediate revisions by the same user not shown) | |||
| Line 7: | Line 7: | ||
What I provide? https://www.bi7jta.org/shop | What I provide? https://www.bi7jta.org/shop | ||
| − | [[File: | + | [[File:23BAAD3F-D666-4BAF-B9CB-E1D9319F1A8B.jpeg|800px]] |
| − | |||
| − | |||
| − | |||
Youtube https://www.youtube.com/winters_huang | Youtube https://www.youtube.com/winters_huang | ||
| Line 20: | Line 17: | ||
== Contact me Now == | == Contact me Now == | ||
| − | + | E-Mail bi7jta@gail.com | |
| − | + | Facebook Message https://facebook.com/winters.cn | |
| − | + | Twitter https://twitter.com/winters_cn | |
| − | + | YouTube https://www.youtube.com/c/WintersHuang | |
| − | + | Telegram https://t.me/bi7jta | |
| − | + | WhatsApp https://wasap.my/+8613927458201 | |
| − | |||
| − | |||
| − | |||
== MMDVM'S Project information == | == MMDVM'S Project information == | ||
| − | === What I | + | === What I Made === |
| − | [[File: | + | [[File:BD8BGR-2.png|800px]] |
| − | + | Listing: https://www.bi7jta.org/shop | |
| − | https://www.bi7jta.org/shop | ||
=== Pi-Star for BPi-M2/M5 === | === Pi-Star for BPi-M2/M5 === | ||
| Line 49: | Line 42: | ||
=== GPIO Definition === | === GPIO Definition === | ||
| − | Raspberry Pi | + | ==== Raspberry Pi BPi NanoPi ==== |
[[File:Duplex_hotSPOT_GPIO_Definition.jpg|800px]] | [[File:Duplex_hotSPOT_GPIO_Definition.jpg|800px]] | ||
| Line 57: | Line 50: | ||
[[File:Nano_hotSPOT_GPIO_Definition.png|800px]] | [[File:Nano_hotSPOT_GPIO_Definition.png|800px]] | ||
| − | Orange Pi | + | ==== Orange Pi ==== |
[[File:OrangePi-GPIO.jpeg|800px]] | [[File:OrangePi-GPIO.jpeg|800px]] | ||
| Line 65: | Line 58: | ||
=== Raspberry Pi All Edition GIPO === | === Raspberry Pi All Edition GIPO === | ||
| − | |||
| + | [[File:树莓派1B-GPIO-Detail.png|800px]] | ||
| + | |||
| + | === Flash Pi-Star OS === | ||
| − | + | ==== Flash SD card(TF card)tools ==== | |
| + | SD card/TF card, at least 8GC10+, Desktop 16G+ | ||
| − | [[File: | + | [[File:Flash-SD-PiStar.png|800px]] |
| − | + | Tool 1: balenaEtcher for macOS ,Windows , Not need format before flash. | |
| + | Download https://etcher.balena.io/ | ||
| − | + | Tool 2: Win32 disk image Writer for Windows (Need format SD Card before flash) | |
| + | SDFormatter: https://www.bi7jta.org/files/PiStarTools/SDFormatterv4.zip | ||
| + | Win32 disk image Writer: https://www.bi7jta.org/files/PiStarTools/win32diskimager-1.0.0-install.zip | ||
| − | |||
| + | ==== J-STAR with HDMI Desktop for Raspberry Pi ==== | ||
| + | This project source from old W0CHP Dashboard, | ||
| + | IMG Download for for Raspberry Pi 4B/3B (Recommend 4B2G+), add extension Allstarlink(SIP/IAX), DVSwitch, Pi-Star FM Netork connect to Allstarlink use USRP protocal(Need MMDVM Repeater kit from @BI7JTA) : | ||
| + | [[File:BI7JTA-Dashboard-V1.png|800px]] | ||
| + | Support Modes: D-Star DMR YSF P25 NXDN M17 FM POCSAG AX.25, FM-Network | ||
| + | Download https://github.com/JTA-STAR/J-STAR/blob/main/README.md | ||
| − | + | ==== J-STAR For BPiM2, BPiM2z ==== | |
| + | |||
| + | for BPiM2, 1G RAM, https://drive.google.com/drive/folders/1rdo-ubDx7-jWKAF7aBeiNfyVrr_WfYeD?usp=sharing | ||
| + | for BPiM2z, 512M RAM, https://drive.google.com/drive/folders/1_vt5qpS1pQ66oB9Amj4K3XLwUU7XTZ9u?usp=sharing | ||
| − | + | [[File:RPi-Desktop-View.jpeg|800px]] | |
| − | + | Github: https://github.com/bi7jta/W0CHP-PiStar-ALL-BPiM2 | |
| + | ** Need help? contact me any time https://www.bi7jta.org/contactus | ||
| + | ** If you buy with TF card from BI7JTA, please ignore this step | ||
| + | ==== Official:MW0MWZ(UK) ==== | ||
| + | http://www.pistar.uk/downloads/ | ||
| + | https://www.pistar.uk/beta/ | ||
| − | For Raspberry Pi 2/3/4 http://www.pistar.uk/downloads/ | + | For Raspberry Pi 2/3/4 http://www.pistar.uk/downloads/ |
[[File:1-PiStarUK-RPI.jpg|800px]] | [[File:1-PiStarUK-RPI.jpg|800px]] | ||
| + | For NanoPi NEO/AIR ,Orange Pi http://www.pistar.uk/beta/ | ||
| − | + | [[File:1-PiStarUK-NEO.jpg|800px]] | |
| + | |||
| + | |||
| + | ==== New:WPSD W0CHP(US) ==== | ||
| + | Support Modes: D-Star DMR YSF P25 NXDN M17 FM POCSAG AX.25, FM-Network | ||
| + | NOTE: Have test not support Raspberry Pi ZeroW, will appear php error , web access appear 500 error. In Raspberry 2W work fine. | ||
| + | https://w0chp.net/w0chp-pistar-dash/</br> | ||
| + | |||
| + | |||
| + | ==== Additional: for Repeater V3F4 New Firmware 460800bps ==== | ||
| + | |||
| + | 2024.1.25 | ||
| + | If you use official PI-STAR (MW0MWZ), in order to detect the new V3F4 repeater firmware, you need to updete && upgrade your PI-STAR to v4.2.0 | ||
| + | |||
| + | Download the new IMG: https://www.pistar.uk/beta/ | ||
| + | Known issues: | ||
| + | 1, If you are using 460800bps the New FM network(MMDVM repeater V3F4), you must to add the follow settings to your | ||
| + | /etc/mmdvmhost | ||
| + | [Modem] | ||
| + | ... | ||
| + | Protocol=uart | ||
| + | UARTPort=/dev/ttyAMA0 | ||
| + | UARTSpeed=460800 | ||
| + | 2, Raspberry Pi ZeroW not have high speed BAUD 460800bps. | ||
| + | |||
| + | |||
| + | 2023.10 | ||
| + | You can also use WPSD PI-STAR: https://w0chp.radio/wpsd/ | ||
| + | |||
| + | === Pi-Star OS for VisualBox(Win10,macOS) === | ||
| + | |||
| + | ==== Download link ==== | ||
| + | https://github.com/bi7jta/Lin-Star-ALL-VisualBox | ||
| + | |||
| + | ==== Update method ==== | ||
| − | |||
| + | ==== Join develop ==== | ||
| − | + | https://www.facebook.com/groups/v3f446 | |
| − | |||
=== Import config file === | === Import config file === | ||
| Line 117: | Line 163: | ||
=== Config WiFi (to Network) === | === Config WiFi (to Network) === | ||
| − | + | ==== Wi-Fi AP method: ==== | |
[[File:MAC-Join-AP.png|800px]] | [[File:MAC-Join-AP.png|800px]] | ||
| Line 137: | Line 183: | ||
[[File:Reboot-page.png|800px]] | [[File:Reboot-page.png|800px]] | ||
| + | ==== Wi-Fi Builder ==== | ||
| + | |||
| + | Visit: https://www.pistar.uk/wifi_builder.php | ||
| + | |||
| + | [[File:WiFi-builder2.png|800px]] | ||
| + | === Config WiFi (with HDMI/Keyboard/Mouse) === | ||
| − | + | Just for BPi-M2, RPi3B/4B with Desktop | |
| − | + | [[File:360078421_6212668438830391_4602124450951159472_n.jpeg|800px]] | |
| − | + | Download BPiM2 IMG: https://github.com/bi7jta/W0CHP-PiStar-ALL-BPiM2 | |
=== Config Static Talkgroup (to DMR BM Server) === | === Config Static Talkgroup (to DMR BM Server) === | ||
| Line 175: | Line 227: | ||
=== Analysis and download running logs === | === Analysis and download running logs === | ||
| + | ==== W0CHP Dashboard ==== | ||
| + | |||
| + | http://pi-star//admin/download_all_logs.php | ||
| + | |||
| + | [[File:W0CHP-Download-alllogs.png|800px]] | ||
| + | |||
| − | http://pi-star/admin/download_modem_log.php (Change the "pi-star" to your DHCP IP Address, such as 192.168.x.x) | + | ==== MW0MWZ Dashboard ==== |
| + | |||
| + | http://pi-star/admin/download_modem_log.php (Change the "pi-star" to your DHCP IP Address, such as 192.168.x.x) | ||
** (Change the domain "pi-star" to your DHCP IP Address, such as 192.168.1.100, if pi-star can't visit) | ** (Change the domain "pi-star" to your DHCP IP Address, such as 192.168.1.100, if pi-star can't visit) | ||
| Line 205: | Line 265: | ||
The Normal Status of MMDVM boot up https://www.youtube.com/shorts/8y6x1uYFovY | The Normal Status of MMDVM boot up https://www.youtube.com/shorts/8y6x1uYFovY | ||
| − | === | + | === Radio Settings to MMDVM === |
| − | + | ==== DMR Mode ==== | |
| − | ==== AnyTone878UV ==== | + | ===== AnyTone878UV ===== |
[[File:AnyTone-878UV-DMR_Programming.png | 800px]] | [[File:AnyTone-878UV-DMR_Programming.png | 800px]] | ||
| Line 214: | Line 274: | ||
PDF: https://www.bi7jta.org/files/UserManuals/Duplex%20hotspot%20User%27s%20Manual_v2020_12_23.pdf | PDF: https://www.bi7jta.org/files/UserManuals/Duplex%20hotspot%20User%27s%20Manual_v2020_12_23.pdf | ||
| − | ==== Motorola XPR4550 ==== | + | ===== Motorola XPR4550 ===== |
[[File:XPR4550-Step1-DMRID-DMR_Programming.png |800px]] | [[File:XPR4550-Step1-DMRID-DMR_Programming.png |800px]] | ||
| Line 230: | Line 290: | ||
https://www.bi7jta.org/files/radioCPS_MMDVM/P8668-M8268-XPR4550_cps_15_dot5_build797_standalone.download.txt | https://www.bi7jta.org/files/radioCPS_MMDVM/P8668-M8268-XPR4550_cps_15_dot5_build797_standalone.download.txt | ||
| − | ==== Hytera ==== | + | ===== Hytera ===== |
| − | ==== TYT MD380 ==== | + | ===== TYT MD380 ===== |
| − | ==== Baofeng DM5R ==== | + | ===== Baofeng DM5R ===== |
| − | === | + | ==== P25 Radios ==== |
https://www.bi7jta.org/files/radioCPS_MMDVM/xts3000/ | https://www.bi7jta.org/files/radioCPS_MMDVM/xts3000/ | ||
| − | === | + | ==== D-Star Radios ==== |
| + | |||
| + | ===== ICOM9700-D-Star ===== | ||
| + | |||
| + | Icom 9700 Terminal Mode With PiStar | ||
| + | |||
| + | Shared by KG5EIU https://davidcappello.com/2019/06/01/icom-9700-terminal-mode-with-pistar/ | ||
| + | |||
| + | Shared by BU2ES https://pete-italk.com/2020/03/10/icom-ic-9700-mmdvm%E9%80%A3%E7%B5%90%E8%88%87%E8%A8%AD%E5%AE%9A%E6%95%99%E5%AD%B8%EF%BC%81/ | ||
| + | |||
| − | === | + | ==== YSF/C4FM Radios ==== |
| − | === | + | ==== NXDN Radios ==== |
https://www.bi7jta.org/files/radioCPS_MMDVM/NXDN/ | https://www.bi7jta.org/files/radioCPS_MMDVM/NXDN/ | ||
| − | === Programming POCSAG/Pager === | + | ==== Programming POCSAG/Pager ==== |
| + | |||
| + | [[File:Pager-CH340.png|800px]] | ||
| + | |||
| + | |||
| + | Programming method and Driver, software. | ||
| + | |||
| + | https://mmdvm.bi7jta.org/search/label/POCSAG | ||
=== Analysis Pi-Star OS Boot logs === | === Analysis Pi-Star OS Boot logs === | ||
| Line 275: | Line 351: | ||
[[File:How-to-enter-ssh.jpeg|800px]] | [[File:How-to-enter-ssh.jpeg|800px]] | ||
| + | |||
=== Simplex HOTSPOT === | === Simplex HOTSPOT === | ||
| − | |||
| − | Youtube Page https://www.youtube.com/wintershuang | + | ==== Fast Config guide ==== |
| − | + | ||
| + | PDF Download https://www.bi7jta.org/files/UserManuals/ | ||
| + | Youtube Page https://www.youtube.com/wintershuang | ||
| + | |||
| + | ==== Firmware upgrade (Modem) ==== | ||
| + | ===== Use PI-STAR script ===== | ||
| + | In order to support M17 feature, we need do the following. | ||
| + | Step_1, Update firmware to the news 1.5.2+ | ||
| + | [[File:Firmware-Upgrade-SimplexRPi-VR2VYE-BI7JTA.png|800px]] | ||
| + | Step_2, Flash or update to WPSD dashboard, because Official Pi-Star MMDVMHost not update for 2 years. | ||
| + | See more: https://www.bi7jta.org/wiki/index.php?title=Main_Page#Version:WPSD_W0CHP.28US.29 | ||
| + | |||
| + | ===== Use ssh script ===== | ||
| + | for Simplex hotspot , Raspberry Pi, BPi M2z, | ||
| + | sudo curl https://raw.github.com/VR2VYE/MMDVM_HS_firmware/master/install_fw_duplex.sh | sudo sh | ||
| + | |||
| + | See more https://github.com/VR2VYE/MMDVM_HS_firmware | ||
| + | |||
| + | === NanoPi NEO/Air HOTSPOT === | ||
| + | |||
| + | ==== Fast Config guide ==== | ||
| + | |||
| + | PDF Download https://www.bi7jta.org/files/UserManuals/ | ||
| + | Youtube Page https://www.youtube.com/wintershuang | ||
| + | |||
| + | ==== Firmware upgrade (Modem) ==== | ||
| + | ===== Use PI-STAR script ===== | ||
| + | In order to support M17 feature, we need do the following. | ||
| + | Step_1, Update firmware to the news 1.5.2+ | ||
| + | [[File:Firmware-Upgrade-NEO-VR2VYE-BI7JTA.png|800px]] | ||
| + | Step_2, Flash or update to WPSD dashboard, because Official Pi-Star MMDVMHost not update for 2 years. | ||
| + | See more: https://www.bi7jta.org/wiki/index.php?title=Main_Page#Version:WPSD_W0CHP.28US.29 | ||
| + | |||
| + | ===== Use ssh script ===== | ||
| + | for NanoPi Simplex hotspot , NanoPi NEO, AIR, | ||
| + | sudo curl https://raw.github.com/VR2VYE/MMDVM_HS_firmware/master/install_fw_nanohs.sh | sudo sh | ||
| + | |||
| + | See more https://github.com/VR2VYE/MMDVM_HS_firmware | ||
=== Duplex HOTSPOT === | === Duplex HOTSPOT === | ||
| Line 320: | Line 433: | ||
[[File:RXLevelRXPotAdjustment.png|800px]] | [[File:RXLevelRXPotAdjustment.png|800px]] | ||
| + | |||
| + | ==== Firmware upgrade (Modem) ==== | ||
| + | |||
| + | ===== Use ssh script ===== | ||
| + | for Duplex hotspot , Raspberry Pi, BPi M2z | ||
| + | sudo curl https://raw.github.com/VR2VYE/MMDVM_HS_firmware/master/install_fw_duplex.sh | sudo sh | ||
| + | |||
| + | or | ||
| + | |||
| + | sudo curl https://www.bi7jta.cn/files/MMDVM_Firmware/duplex_HAT/onekeyflash_RPi_fw_RPi_Duplex_VR2VYE_Ver1.6.1_CN.sh | sudo sh | ||
| + | |||
| + | If WPSD webSSH not work , use J-Star, PI-STAR webSSH, or Windows Powershell, Putty, MobaXterm ssh tools. | ||
| + | |||
| + | Login: ssh pi-star@192.168.0.1 (change to your IP address), Password: raspberry | ||
| + | |||
| + | |||
| + | [[File:PowerShell.png|800px]] | ||
| + | |||
| + | |||
| + | See more https://github.com/VR2VYE/MMDVM_HS_firmware | ||
| + | |||
| + | ===== Use WPSD command ===== | ||
| + | |||
| + | In order to support M17 feature, we need do the following. | ||
| + | Step_1, Update firmware to the news 1.5.2+ , the new is 1.6.1 | ||
| + | |||
| + | [[File:Firmware-Upgrade-Duplex-VR2VYE-BI7JTA.png|800px]] | ||
| + | |||
| + | Step_2, Flash or update to WPSD dashboard, because Official Pi-Star MMDVMHost not update for 2 years. | ||
| + | See more: https://www.bi7jta.org/wiki/index.php?title=Main_Page#Version:WPSD_W0CHP.28US.29 | ||
==== Troubleshooting ==== | ==== Troubleshooting ==== | ||
| Line 336: | Line 479: | ||
Where I can find the demo video? YouTube: https://youtube.com/winters_huang | Where I can find the demo video? YouTube: https://youtube.com/winters_huang | ||
| + | |||
==== Pi-Star Settings ==== | ==== Pi-Star Settings ==== | ||
| + | |||
| + | New firmware you must use new MMDVMHost(Pi-Star OS) ,2023.10 (Click to zoom in) | ||
| + | |||
| + | [[File:FM-M17-Frimware-Need-WPSD-dashboard.png|800px]] | ||
http://pi-star/admin/configure.php | http://pi-star/admin/configure.php | ||
| Line 350: | Line 498: | ||
==== Very Important Process: Calibration Frequency Offset ==== | ==== Very Important Process: Calibration Frequency Offset ==== | ||
| + | |||
| + | How to calibrate it? the frequency is shifted too far? | ||
| + | 1, Calibrate your RTL-SDR frequency, Config --> PPM, Send a FM signal and received by your RTL-SDR SDR# | ||
| + | 2, Adjust the PPM , let your RTL-SDR frequency same as your handset Radio, | ||
| + | 3, Send the same frequency from your GM338, GM340 repeater TX/RX radio , find out the offset, compare your Handset radio. | ||
| + | 4, Calibrate your GM338, GM340 repeater TX/RX radio frequency (Hz), use Professional software, if you can't find it, jump to 5th | ||
| + | 5, Write your handset radio frequency , suit your repeater radio. | ||
| + | |||
| + | ===== Frequency Offset Calibrate software ===== | ||
| + | TUNER Calibrate for GM338 CDM1550 GM340 GM350 GM360, and Motorola Analog mobile radio | ||
| + | |||
| + | [[File:Motorola-tuner.png|800px]] | ||
| + | |||
| + | Download: https://www.bi7jta.org/files/radioCalibrate-Frequency/ | ||
| + | |||
| + | ===== How to use Motorola Tuner and RSP Spectrum Analyser ===== | ||
| + | |||
| + | The photo was shared by @ BG3MBB | ||
| + | |||
| + | Also go to YouTube search "Motorola tuner" . https://www.youtube.com/results?search_query=motorola+tuner | ||
| + | |||
| + | |||
| + | [[File:Motorola_Tuner-for-Perfessional-2.jpg|746px]] | ||
| + | |||
| + | |||
| + | ** You can also use RTL-SDR, SDRPlay, if you have adjustment your SDR PPM (frequency offset) | ||
| + | |||
| + | [[File:RSP-SpectrumAnalyser.png|800px]] | ||
| + | |||
| + | |||
| + | [[File:RSP-SpectrumAnalyser-2.75KHz.png|800px]] | ||
| + | |||
| + | ===== Repeater Bandwidth for test ===== | ||
Repeater board Sampling frequency bandwidth (MMDVM RX) :25KHz,</br> | Repeater board Sampling frequency bandwidth (MMDVM RX) :25KHz,</br> | ||
Your DMR/C4FM/P25/DSTAR/NXDN radio decode bandwidth (MMDVM TX):12.5KHz,</br> | Your DMR/C4FM/P25/DSTAR/NXDN radio decode bandwidth (MMDVM TX):12.5KHz,</br> | ||
| Line 449: | Line 630: | ||
| + | FT-857 TXInvert @IK1ZVK | ||
| + | |||
| + | [[File:TXInvert0.png|800px]] | ||
User'S Guide Reference https://www.bi7jta.org/wiki/index.php?title=Main_Page#FT-7900.2F7800.2F8900_YAESU | User'S Guide Reference https://www.bi7jta.org/wiki/index.php?title=Main_Page#FT-7900.2F7800.2F8900_YAESU | ||
==== FTM-100D/FTM-350/FTM-400D ==== | ==== FTM-100D/FTM-350/FTM-400D ==== | ||
| − | Suit to FTM-100D FTM-350 FTM-400D, Connector MINI-PIN 10PIN | + | Suit to FTM-100D FTM-300D FTM-350 FTM-400D, Connector MINI-PIN 10PIN |
[[File:FTM-400D-ALL.png|799px]] | [[File:FTM-400D-ALL.png|799px]] | ||
| Line 469: | Line 653: | ||
[[File:FTM-400DR-MMDVM-ALL.png|799px]] | [[File:FTM-400DR-MMDVM-ALL.png|799px]] | ||
| + | |||
| + | |||
| + | RXInvert settings in Expert mode (Just Experiences value , Not absolutely). | ||
| + | |||
| + | [[File:FTM-400D-VHF.png|800px]] | ||
| + | |||
| + | |||
| + | FTM-300D | ||
| + | |||
| + | [[File:BA7MPY-300D-Radio.png|533px]] | ||
| + | |||
| + | NOTE: See also 3.18.60.1 The TX Pot(TXLevel in hardware) Recommend value | ||
| + | https://www.bi7jta.org/wiki/index.php?title=Main_Page#The_TX_Pot.28TXLevel_in_hardware.29_Recommend_value | ||
==== DR-1X YAESU ==== | ==== DR-1X YAESU ==== | ||
| − | Note: As | + | |
| + | Note: As we have test, NOT SUPPORT DR-2X,DR-1XFR, because YAESU have lock "DR-2X,DR-1XFR" and can not set RX 9600bps! Unless you can crack it. | ||
| − | + | Connection sample: | |
| − | + | [[File:DR-1X-Cable.png|800px]] | |
| + | |||
| + | Key settings: | ||
| + | 1, DR-1X, Data jack , set RX 9600bps | ||
| + | 2, DR-1X, FM mode, | ||
| + | 3, Pi-Star expert mode: RX/TXInvert = 1 | ||
Data jack | Data jack | ||
| Line 490: | Line 693: | ||
[[File:DR-1X-MMDVM-V3F4.JPG|500px|]] | [[File:DR-1X-MMDVM-V3F4.JPG|500px|]] | ||
| + | |||
| + | |||
| + | Spectrum test video [https://www.youtube.com/watch?v=xtx1nRY0LbU&feature=youtu.be https://www.youtube.com/watch?v=xtx1nRY0LbU] | ||
| + | |||
| + | ==== Yaesu / Vertex VX-5000 ==== | ||
| + | |||
| + | [[File:Yaesu-Vertex-VX-5000.png|800px|]] | ||
| + | |||
| + | https://www.repeater-builder.com/yvs/vxr-5000-repeater-mods.html | ||
==== GM3188/GM3688/CM140/CM340 ==== | ==== GM3188/GM3688/CM140/CM340 ==== | ||
| − | |||
| + | Programming your GM3688 GM3188 Xir M3688, RX TX the same settings. | ||
[[File:GM3188_Program_02.jpeg|500px]] | [[File:GM3188_Program_02.jpeg|500px]] | ||
| + | |||
| + | |||
| + | Other information: | ||
| + | |||
| + | [[File:GM3188-V3F4-ALL.JPG|frameless|500px|]] | ||
==== GM338-CDM1250-CDM1550-CDM750-MCX760 ==== | ==== GM338-CDM1250-CDM1550-CDM750-MCX760 ==== | ||
| Line 504: | Line 721: | ||
[[File:Build-MMDVM-repeater-for-GM338-CDM1250-CDM1550-CDM750.JPG|frameless|500px|]] | [[File:Build-MMDVM-repeater-for-GM338-CDM1250-CDM1550-CDM750.JPG|frameless|500px|]] | ||
| + | |||
| + | Additional description: | ||
| + | |||
| + | [[File:RXInert-TXInver-for-GM338.jpg|800px|]] | ||
| + | |||
| + | Pinout: use the Center 16PINS | ||
[[File:GM340-Accessory.JPG|frameless|800px|]] | [[File:GM340-Accessory.JPG|frameless|800px|]] | ||
| Line 516: | Line 739: | ||
[[File:ICOM2820_ALL.png|800px]] | [[File:ICOM2820_ALL.png|800px]] | ||
| + | |||
| + | ==== ICOM Id-880-HB9TUO ==== | ||
| + | |||
| + | Cable same as FT-7800 https://www.bi7jta.org/shop/mmdvm-repeater-board-v3f4-dmr-ysf-d-star-nxdn-pocsag-fm-3#attr=289,287,117 | ||
| + | |||
| + | [[File:Icom-Id-880-HB9TUO-vs-ft7800-TAG.png|800px]] | ||
==== GM300/M120 Motorola ==== | ==== GM300/M120 Motorola ==== | ||
| Line 545: | Line 774: | ||
[[File:GM340_CPS_Template.JPG|800px]] | [[File:GM340_CPS_Template.JPG|800px]] | ||
| + | |||
[[File:GM340_Expert_Settings.JPG|600px]] | [[File:GM340_Expert_Settings.JPG|600px]] | ||
| + | Check again. Debug mode recommend 25KHz. After you make your RX TX work , you can try 20KHz, 12.5KHz. | ||
| + | |||
| + | [[File:GM340-RX-Check.png|600px]] | ||
| + | |||
| + | Double check settings and logs. | ||
| + | |||
| + | [[File:GM340-key-settings-and-logs.jpg|1559px]] | ||
Radio CPS software and template | Radio CPS software and template | ||
https://www.bi7jta.org/files/radioCPS/ | https://www.bi7jta.org/files/radioCPS/ | ||
| + | |||
| + | Where I can get MMDVM modem with Technical Support? https://www.bi7jta.org/shop/mmdvm-repeater-board-v3f4-dmr-ysf-d-star-nxdn-pocsag-fm-3#attr=289,284,117 | ||
| + | |||
| + | ==== GM350 GM950E Hardware modify ==== | ||
| + | Shared by @DL9AM | ||
| + | GM350_GM950_MODIFICATION_RXFLAT_TXFLAT_MMDVM | ||
| + | |||
| + | [[File:DL9AM-GM350_GM950_MODIFICATION_RXFLAT_TXFLAT_MMDVM.jpg|800px]] | ||
==== GM950i Motorola ==== | ==== GM950i Motorola ==== | ||
| Line 569: | Line 814: | ||
[[File:GM950i_Spectrum_VS_GM3188_2.75KHz.png|800px]] | [[File:GM950i_Spectrum_VS_GM3188_2.75KHz.png|800px]] | ||
| + | |||
| + | |||
| + | GM950e Pinout RX(Pin11) NOT available, you need a little change Inner-Circuit. | ||
| + | |||
| + | [[File:GM950e内部RX跳线BG6BKU-2.png|422px]] | ||
==== Pro5100 Motorola ==== | ==== Pro5100 Motorola ==== | ||
| − | Experiences shared by Users: https://www.facebook.com/groups/443231163363290/search/?q=Pro5100 | + | Programming settings reference |
| + | |||
| + | GM338/CDM1250/CDM1550: https://www.bi7jta.org/wiki/index.php?title=Main_Page#GM338-CDM1250-CDM1550-CDM750-MCX760 | ||
| + | GM340/GM350/GM360: https://www.bi7jta.org/wiki/index.php?title=Main_Page#GM340.2FGM350.2FGM360 | ||
| + | |||
| + | Experiences shared by Users in Facebook: https://www.facebook.com/groups/443231163363290/search/?q=Pro5100 | ||
==== Kenwood TK8180 TK8185 ==== | ==== Kenwood TK8180 TK8185 ==== | ||
| − | + | [[File:TK8185-中继.jpeg|500px]] | |
[[File:TK8180_SettingGuide.png|800px]] | [[File:TK8180_SettingGuide.png|800px]] | ||
| Line 587: | Line 842: | ||
| − | + | Get the device: https://www.bi7jta.org/shop/mmdvm-repeater-board-v3f4-dmr-ysf-d-star-nxdn-pocsag-fm-3 | |
Facebook Group https://www.facebook.com/groups/v3f446 | Facebook Group https://www.facebook.com/groups/v3f446 | ||
| Line 622: | Line 877: | ||
Buy the cable with MMDVM Kit from BI7JTA'S HAM RADIO https://www.bi7jta.org/shop/mmdvm-repeater-board-v3f4-dmr-ysf-d-star-nxdn-pocsag-fm-3#attr=63,168,117 | Buy the cable with MMDVM Kit from BI7JTA'S HAM RADIO https://www.bi7jta.org/shop/mmdvm-repeater-board-v3f4-dmr-ysf-d-star-nxdn-pocsag-fm-3#attr=63,168,117 | ||
| + | |||
| + | [[File:TKR-820-2.jpeg|320px]] | ||
| + | |||
[[File:TKR820-Accessory-connector-pin-assignment-repeaterbuilder.png|800px]] | [[File:TKR820-Accessory-connector-pin-assignment-repeaterbuilder.png|800px]] | ||
| Line 650: | Line 908: | ||
PDF @K7VE : https://www.bi7jta.org/files/Repeater-Build-Ref/TKR850-TKR820-TKR720/tkr-820-dstar-MMDVM-repeaterBuilder.pdf | PDF @K7VE : https://www.bi7jta.org/files/Repeater-Build-Ref/TKR850-TKR820-TKR720/tkr-820-dstar-MMDVM-repeaterBuilder.pdf | ||
| + | |||
| − | + | Thanks @W5ZIT @K7VE blog sharing. | |
| − | + | More join and discuss in MMDVM Facebook Group: https://www.facebook.com/groups/v3f446/permalink/461736281512778 | |
| − | + | ==== Kenwood TKR-850 TKR-750 ==== | |
| + | Pi-Star Expert settings: http://pi-star/admin/expert/edit_mmdvmhost.php | ||
| + | TXInvert=1 | ||
| + | RXInvert=1 (UHF:1, VHF:0, just a experiences value, NOT absolute) | ||
| + | PTTInvert=0 | ||
| + | TXDelay=300 | ||
| + | DMRDelay=7 | ||
| − | + | Programming Channel settings: | |
| + | [[File:TKR-850-Channel-Programming-MMDVM.png|800px]] | ||
| − | + | TKR-850 repeater kit with soldering connector. | |
| + | |||
| + | [[File:TKR850.jpeg|800px]] | ||
| + | |||
| + | NOTE: @BI7JTA test not support FM , when use MMDVM/Duplex mode . | ||
| + | |||
| + | [[File:TKR850-pinout-FM-SQL.png|800px]] | ||
| − | + | Checkout the Modem and Cable: https://www.bi7jta.org/shop/mmdvm-repeater-board-v3f4-dmr-ysf-d-star-nxdn-pocsag-fm-3#attr=63,27,117 | |
| − | + | [[File:TKR-850-Cable.jpeg|800px]] | |
| − | + | Reference @VK4JLM: https://www.vk4jlm.com/index.php/projects/kenwood-tkr-850-multimode-repeater/ | |
| − | + | tkr-850-svc-man-revised https://www.repeater-builder.com/kenwood/pdfs/tkr-850-svc-man-revised.pdf | |
| − | + | CPS Download : for KPG-91d v 2.13, DN, DC TKR-750, 850, 751, 851 (DN for Narrowband) | |
| + | http://www.k9rod.net/Commercial.html | ||
| − | + | Programming template provide by @BI7JTA | |
| + | https://www.bi7jta.org/files/radioCPS/tkr850tkr750/ | ||
==== Kenwood Other ==== | ==== Kenwood Other ==== | ||
| Line 729: | Line 1,003: | ||
[[File:XPR5550e_Spectrum.jpg|800px]]]] | [[File:XPR5550e_Spectrum.jpg|800px]]]] | ||
| + | |||
| + | |||
| + | ==== XPR 8300 MotoTRBO repeater ==== | ||
| + | |||
| + | https://www.repeater-builder.com/motorola/xpr-cat/xpr-cat.html | ||
| + | |||
| + | Same as XPR4550 | ||
| + | |||
| + | 26-pin MAP Accessory Connector (XPR 8300) Signal Assignments | ||
| + | |||
| + | XPR | ||
| + | Pin Wire | ||
| + | Color XPR Signal | ||
| + | or Function DE-9 | ||
| + | Pin CAT | ||
| + | Signal | ||
| + | 11 Brown TX Audio Input (Analog only) 8 TX Audio #1 Output | ||
| + | 12 Red Ground 1,6 Ground | ||
| + | 14 Orange RX Audio Output (Analog only) 3 RX Audio #1 Input | ||
| + | 17 Yellow External PTT Input (Analog only) 7 PTT #1 Output | ||
| + | 19 Green Monitor Input (Analog only) 5 N/C | ||
| + | 20 Blue Repeater Knockdown Input 4 Switch #1 Output | ||
| + | 21 Black PL/Talkgroup Detect Output (COR) 2 COR #1 Input | ||
| + | 22 White Football Knockdown Input 9 N/C | ||
| + | |||
| + | ==== MTM5400 Motorola Tetra ==== | ||
| + | |||
| + | Data Pinout to MMDVM V3F4@BI7JTA made | ||
| + | |||
| + | [[File:MTM5400-defined-bi7jta.png|800px]] | ||
| + | |||
| + | More: https://www.bi7jta.org/blog/mmdvm-2/79#scrollTop=0 | ||
==== XiR M3188/XiR M3688 DMR radio ==== | ==== XiR M3188/XiR M3688 DMR radio ==== | ||
| − | The pinout and data define same as GM338/CDM1250/1550 | + | NOTE: |
| + | Remove pin3 COS inhibit, otherwise will affect Duplex/Repeater transmit, experience shared by @DW7FJK Facebook Message https://www.facebook.com/100000176520522/ | ||
| + | The pinout and data define same as GM338/CDM1250/1550 | ||
| + | TXInvet=1, RXInvet=1, PTTInvert=0 | ||
| + | |||
| + | [[File:中继板-XirM3688.png|721px]] | ||
| + | |||
[[File:XiR_M3188_XiR_M3688-ALL.png|800px]] | [[File:XiR_M3188_XiR_M3688-ALL.png|800px]] | ||
| Line 815: | Line 1,127: | ||
| − | I have made a cable for MMDVM repeater board , you can checkout in my shop https://www.bi7jta.org/ | + | I have made a cable for MMDVM repeater board , you can checkout in my shop https://www.bi7jta.org/shop/mmdvm-repeater-board-v3f4-dmr-ysf-d-star-nxdn-pocsag-fm-3#attr=63,27,117 |
[[File:MTR2000-DEMO.png|500px]] | [[File:MTR2000-DEMO.png|500px]] | ||
| Line 825: | Line 1,137: | ||
| − | + | My MTR2000 programming data, software, https://www.bi7jta.org/files/radioCPS/mtr2000/ | |
| − | https://www.bi7jta.org/files/radioCPS/mtr2000/ | + | |
| + | [[File:MTR2000-CPS-Data.png|800px]] | ||
| + | |||
| + | ==== GM1200 ==== | ||
| + | Reference MCS2000 | ||
==== MCS2000 ==== | ==== MCS2000 ==== | ||
| Line 834: | Line 1,150: | ||
| − | [[File: | + | [[File:RX-innerJump.jpeg|447px]] [[File:MCS2000_RXOnly.jpg|500px]] |
| + | |||
| + | New Adapter connection Diagram | ||
| + | |||
| + | [[File:MCS2000-Duplex-Simplex.png|800px]] | ||
| + | |||
| + | <syntaxhighlight lang="bash"> | ||
| + | Pi-Star Expert mode settings (/etc/mmdvmhost) , change the IP address to your Local IP address | ||
| + | http://192.168.31.76/admin/expert/edit_mmdvmhost.php [Pi-Star MW0MWZ] | ||
| + | http://192.168.2.8/admin/advanced/edit_mmdvmhost.php [WPSD Dashboard] | ||
| + | [Modem] | ||
| + | Port=/dev/ttyAMA0 | ||
| + | TXInvert=0 | ||
| + | RXInvert=1 | ||
| + | PTTInvert=0 | ||
| + | TXDelay=100 | ||
| + | RXOffset=0 | ||
| + | TXOffset=0 | ||
| + | DMRDelay=0 | ||
| + | RXLevel=50 | ||
| + | TXLevel=50 | ||
| + | RXDCOffset=0 | ||
| + | TXDCOffset=0 | ||
| + | RFLevel=100 | ||
| + | CWIdTXLevel=50 | ||
| + | D-StarTXLevel=50 | ||
| + | DMRTXLevel=50 | ||
| + | YSFTXLevel=50 | ||
| + | P25TXLevel=50 | ||
| + | NXDNTXLevel=50 | ||
| + | POCSAGTXLevel=50 | ||
| + | RSSIMappingFile=/usr/local/etc/RSSI.dat | ||
| + | Trace=0 | ||
| + | Debug=0 | ||
| + | </syntaxhighlight> | ||
| − | + | Have problem ? Download logs and sent to BI7JTA@GMAIL.com | |
| + | https://www.bi7jta.org/wiki/index.php?title=Main_Page#Analysis_and_download_running_logs | ||
| − | + | Get the kit https://www.bi7jta.org/shop/mmdvm-repeater-board-v3f4-dmr-ysf-d-star-nxdn-pocsag-fm-3 | |
==== Tait TM8100 ==== | ==== Tait TM8100 ==== | ||
| Line 864: | Line 1,215: | ||
[[File:T8800-1.jpeg|337px]] | [[File:T8800-1.jpeg|337px]] | ||
| + | |||
| + | ==== Tait TB7100 ==== | ||
| + | [[File:Xnip2023-06-27_09-58-11.png|800px]] | ||
| + | |||
| + | [[File:Xnip2023-06-27_09-56-32.png|800px]] | ||
| + | |||
| + | Reference: | ||
| + | |||
| + | http://www.lyonscomputer.com.au/Radio-Transceivers/Tait-Radios/TB7100-Repeater/TB7100-Repeater.html | ||
| + | |||
| + | http://www.sk2hg.se/wp/?page_id=3246&fbclid=IwAR3lTnMPgTtgrxAWLk_2v283jeWtZrFPcD9tJvYB7Z4ieGKWhjfrVLLDBFY | ||
| + | |||
| + | Discuss: https://www.facebook.com/groups/v3f446/posts/992718208414580/ | ||
==== Huawei E403 SU450C ==== | ==== Huawei E403 SU450C ==== | ||
| Line 892: | Line 1,256: | ||
Youtube https://www.youtube.com/watch?v=Fg1CkeIteBc&t=61s | Youtube https://www.youtube.com/watch?v=Fg1CkeIteBc&t=61s | ||
| + | ==== Hytera RD625 ==== | ||
| + | Sharing by @Konzipiert von OE5PON | ||
| + | https://www.oevsv.at/export/oevsv/technik-folder/oe5_vm/bin/triplemode_repeater01.pdf | ||
==== Other Radio not test ==== | ==== Other Radio not test ==== | ||
| Line 903: | Line 1,270: | ||
===== GM660 ===== | ===== GM660 ===== | ||
https://onenewham.uk/working-on-a-multi-mode-repeater-for-gb3bz/?fbclid=IwAR32Y1RyqwDmiPhnJ0lLUbinsAFTUlSKdHYcq5rAmJ2vULXh10aDLN_scVk | https://onenewham.uk/working-on-a-multi-mode-repeater-for-gb3bz/?fbclid=IwAR32Y1RyqwDmiPhnJ0lLUbinsAFTUlSKdHYcq5rAmJ2vULXh10aDLN_scVk | ||
| + | |||
| + | ===== MX800 (Motorola OEM) ===== | ||
| + | https://youtube.com/shorts/jbQZoJQIOxE?feature=share | ||
| + | |||
| + | [[File:DB15.png|800px]] | ||
| + | |||
| + | Also reference Allstarlink build https://wiki.w9cr.net/index.php/MX800 | ||
==== Recommend Radio for MMDVM G4KLX ==== | ==== Recommend Radio for MMDVM G4KLX ==== | ||
| Line 919: | Line 1,293: | ||
==== FM Analog mode ==== | ==== FM Analog mode ==== | ||
| + | NOTE: FM Mode just work in Motorola GM338 GM340, GMxx,CDM1250, CDM1550 Serial now, NOT work in YAESU ,ICOM, KENWOOD. | ||
| + | In New firmware, you have to use new MMDVMHost(Pi-Star OS) | ||
| + | |||
| + | ===== OS requirement ===== | ||
| + | Pi-Star for Repeater V3F4 New Firmware | ||
| + | 2024.1.25 | ||
| + | If you use official PI-STAR (MW0MWZ), in order to detect the new V3F4 repeater firmware, you need to updete && upgrade your PI-STAR to v4.2.0 | ||
| + | |||
| + | Download the new IMG: https://www.pistar.uk/beta/ | ||
| + | Known issues: | ||
| + | 1, If you are using 460800bps the New FM network(MMDVM repeater V3F4), you must to add the follow settings to your | ||
| + | /etc/mmdvmhost | ||
| + | [Modem] | ||
| + | ... | ||
| + | Protocol=uart | ||
| + | UARTPort=/dev/ttyAMA0 | ||
| + | UARTSpeed=460800 | ||
| + | 2, Raspberry Pi ZeroW not have high speed BAUD 460800bps. | ||
| + | |||
| + | 2024.1.15 | ||
| + | J-STAR (Desktop PI-STAR, Recommend), customized by BI7JTA https://github.com/JTA-STAR/J-STAR | ||
| + | |||
| + | 2023.10 | ||
| + | You can also use WPSD PI-STAR: https://w0chp.radio/wpsd/ | ||
From Pi-Star V4.1x and update to the new, the FM configuration and MMDVMHost have FM feature. | From Pi-Star V4.1x and update to the new, the FM configuration and MMDVMHost have FM feature. | ||
| + | |||
| + | |||
| + | ===== FM Settings ===== | ||
Modify your config in expert mode , such as: | Modify your config in expert mode , such as: | ||
| Line 942: | Line 1,343: | ||
Flash FM firmware, Copy the follow commands to ssh dialog: | Flash FM firmware, Copy the follow commands to ssh dialog: | ||
| + | |||
| + | New Firmware Version see the follow segment [M17 Mode FM build 2023060] | ||
| + | |||
| + | FM radio set : TalkAround Off, R:CTS 88.5Hz, T:CTS: 88.5Hz | ||
| + | |||
| + | YouTube: https://youtube.com/shorts/KGmUNapGirM?feature=share | ||
| + | |||
| + | |||
| + | The new FM settings: https://github.com/g4klx/MMDVMHost/blob/master/MMDVM.ini | ||
| + | |||
| + | <syntaxhighlight lang="bash"> | ||
| + | [FM] | ||
| + | Enable=0 | ||
| + | Callsign=BI7JTA | ||
| + | CallsignSpeed=20 | ||
| + | CallsignFrequency=1000 | ||
| + | CallsignTime=10 | ||
| + | CallsignHoldoff=0 | ||
| + | CallsignHighLevel=50 | ||
| + | CallsignLowLevel=20 | ||
| + | CallsignAtStart=1 | ||
| + | CallsignAtEnd=1 | ||
| + | CallsignAtLatch=0 | ||
| + | RFAck=K | ||
| + | ExtAck=N | ||
| + | AckSpeed=20 | ||
| + | AckFrequency=1750 | ||
| + | AckMinTime=4 | ||
| + | AckDelay=1000 | ||
| + | AckLevel=50 | ||
| + | # Timeout=180 | ||
| + | TimeoutLevel=80 | ||
| + | CTCSSFrequency=88.5 | ||
| + | CTCSSThreshold=30 | ||
| + | # CTCSSHighThreshold=30 | ||
| + | # CTCSSLowThreshold=20 | ||
| + | CTCSSLevel=20 | ||
| + | KerchunkTime=0 | ||
| + | HangTime=7 | ||
| + | AccessMode=1 | ||
| + | # LinkMode=1 to remove almost all of the logic control | ||
| + | LinkMode=0 | ||
| + | COSInvert=0 | ||
| + | NoiseSquelch=0 | ||
| + | SquelchThreshold=30 | ||
| + | # SquelchHighThreshold=30 | ||
| + | # SquelchLowThreshold=20 | ||
| + | RFAudioBoost=1 | ||
| + | MaxDevLevel=90 | ||
| + | ExtAudioBoost=1 | ||
| + | ModeHang=10 | ||
| + | </syntaxhighlight> | ||
| + | |||
| + | ==== FM Network 460800bps(Connect to Allstarlink) ==== | ||
| + | |||
| + | IMPORTANCE: In order to enable 460800bps speed, Recommend Flash Dashboard Custmized by me (Allstarlink, DVSwtich, MMDVMHost FM Network in one) | ||
| + | https://www.bi7jta.org/wiki/index.php?title=Main_Page#Version:_BI7JTA-Dashboard_for_Raspberry_Pi_4B.2F3B | ||
| + | [[File:BI7JTA-Dashboard-V1.png|800px]] | ||
| + | |||
| + | Flash Firmware in your webSSH | ||
| + | |||
| + | <syntaxhighlight lang="bash"> | ||
| + | sudo curl https://www.bi7jta.org/files/MMDVM_Firmware/repeater_HAT/upgrade_repeater_FW_Network_12MHz_b20230726.sh | sudo sh | ||
| + | </syntaxhighlight> | ||
| + | |||
| + | [[File:FM_Network_flash_success.png|533px]] | ||
| + | |||
| + | If you got flash error , try Manual flash: https://www.bi7jta.org/blog/mmdvm-2/manual-flash-firmware-fm-network-87 | ||
| + | |||
| + | MMDVMHost full edit in W0CHP pi-star: http://pi-star/admin/advanced/fulledit_mmdvmhost.php | ||
| + | |||
| + | ===== FM and FM Network Settings ===== | ||
| + | |||
| + | <syntaxhighlight lang="bash"> | ||
| + | https://github.com/g4klx/MMDVMHost/blob/master/MMDVM.ini | ||
| + | |||
| + | [Modem] | ||
| + | Port=/dev/ttyAMA0 | ||
| + | ... | ||
| + | Protocol=uart | ||
| + | UARTPort=/dev/ttyAMA0 | ||
| + | UARTSpeed=460800 | ||
| + | ## 460800bps support FM Network , connect to Allstarlink, Analog Bridge(DVSwitch) | ||
| + | ## WARNING: Just RPi 3B,4B,5B support 460800bps, | ||
| + | ## RPi ZW, 2W, 2B, BananaPi M2z M2 NOT Support 460800bps, flash 115200bps firmware instead. | ||
| + | ... | ||
| + | |||
| + | [FM Network] | ||
| + | Enable=1 | ||
| + | Protocol=USRP | ||
| + | LocalAddress=0.0.0.0 | ||
| + | LocalPort=12345 <Allstarlink, DVSwitch Analog_Bridge or AnalogReflector USRP TX Port > | ||
| + | GatewayAddress=192.168.31.118 <Allstarlink, DVSwitch Analog_Bridge or AnalogReflector USRP IP> | ||
| + | GatewayPort=12345 <Allstarlink, DVSwitch Analog_Bridge or AnalogReflector USRP RX Port > | ||
| + | PreEmphasis=1 | ||
| + | DeEmphasis=1 | ||
| + | TXAudioGain=1.0 | ||
| + | RXAudioGain=1.0 | ||
| + | ModeHang=20 | ||
| + | Debug=1 | ||
| + | LinkMode=1 | ||
| + | |||
| + | [FM] | ||
| + | Enable=0 | ||
| + | Callsign=BI7JTA | ||
| + | CallsignSpeed=20 | ||
| + | CallsignFrequency=1000 | ||
| + | CallsignTime=10 | ||
| + | CallsignHoldoff=0 | ||
| + | CallsignHighLevel=50 | ||
| + | CallsignLowLevel=20 | ||
| + | CallsignAtStart=1 | ||
| + | CallsignAtEnd=1 | ||
| + | CallsignAtLatch=0 | ||
| + | RFAck=K | ||
| + | ExtAck=N | ||
| + | AckSpeed=20 | ||
| + | AckFrequency=1750 | ||
| + | AckMinTime=4 | ||
| + | AckDelay=1000 | ||
| + | AckLevel=50 | ||
| + | # Timeout=180 | ||
| + | TimeoutLevel=80 | ||
| + | CTCSSFrequency=88.5 | ||
| + | CTCSSThreshold=30 | ||
| + | # CTCSSHighThreshold=30 | ||
| + | # CTCSSLowThreshold=20 | ||
| + | CTCSSLevel=20 | ||
| + | KerchunkTime=0 | ||
| + | HangTime=7 | ||
| + | AccessMode=1 | ||
| + | # LinkMode=1 to remove almost all of the logic control | ||
| + | LinkMode=0 | ||
| + | COSInvert=0 | ||
| + | NoiseSquelch=0 | ||
| + | SquelchThreshold=30 | ||
| + | # SquelchHighThreshold=30 | ||
| + | # SquelchLowThreshold=20 | ||
| + | RFAudioBoost=1 | ||
| + | MaxDevLevel=90 | ||
| + | ExtAudioBoost=1 | ||
| + | ModeHang=10 | ||
| + | |||
| + | </syntaxhighlight> | ||
| + | |||
| + | ===== OS requirement ===== | ||
| + | In New firmware, you have to use new MMDVMHost(Pi-Star OS) | ||
| + | |||
| + | 2024.1.25 | ||
| + | If you use official PI-STAR (MW0MWZ), in order to detect the new V3F4 repeater firmware, you need to updete && upgrade your PI-STAR to v4.2.0 | ||
| + | |||
| + | Download the new IMG: https://www.pistar.uk/beta/ | ||
| + | Known issues: | ||
| + | 1, If you are using 460800bps the New FM network(MMDVM repeater V3F4), you must to add the follow settings to your | ||
| + | /etc/mmdvmhost | ||
| + | [Modem] | ||
| + | ... | ||
| + | Protocol=uart | ||
| + | UARTPort=/dev/ttyAMA0 | ||
| + | UARTSpeed=460800 | ||
| + | 2, Raspberry Pi ZeroW not have high speed BAUD 460800bps. | ||
| + | |||
| + | 2024.1.15 | ||
| + | J-STAR (Desktop PI-STAR, Recommend), customized by BI7JTA https://github.com/JTA-STAR/J-STAR | ||
| + | |||
| + | 2023.10 | ||
| + | You can also use WPSD PI-STAR: https://w0chp.radio/wpsd/ | ||
| + | |||
| + | ==== M17 Mode FM 115200bps build 20230606 ==== | ||
| + | |||
| + | PI-STAR 4.1.8+ ,4.2.0, WPSD, J-STAR with new MMDVMHost, just detect the new firmware Ver 2 FM Mode. | ||
| + | |||
| + | Flash Firmware in your webSSH | ||
| + | |||
| + | <syntaxhighlight lang="bash"> | ||
| + | #for RPi3B/4B/ZeroW/BPiM2z | ||
| + | sudo curl https://www.bi7jta.org/files/MMDVM_Firmware/repeater_HAT/upgrade_repeater_FW_M17_12MHz_b20230606.sh | sudo sh | ||
| + | </syntaxhighlight> | ||
| + | |||
<syntaxhighlight lang="bash"> | <syntaxhighlight lang="bash"> | ||
| − | + | #for BPiM2u BPiM2b | |
| − | curl | + | sudo curl https://www.bi7jta.org/files/MMDVM_Firmware/repeater_HAT/upgrade_repeater_FW_M17_12MHz_BPiM2b_b20230606.sh | sudo sh |
| − | |||
| − | |||
</syntaxhighlight> | </syntaxhighlight> | ||
| − | ==== | + | Check flash success. |
| − | + | View Logs: tail -100f /var/log/pi-star/MMDVM-2023-09-11.log | |
| − | Pi-Star Support W0CHP version: https://www.facebook.com/groups/371652781811739 | + | D: 2023-09-11 07:21:16.116 Opening the MMDVM |
| + | I: 2023-09-11 07:21:19.930 MMDVM protocol version: 2, description: MMDVM RB_STM32_DVM(446) 20221121 12.0000 MHz GitID #bf23a94 | ||
| + | I: 2023-09-11 07:21:19.930 CPU: ST-Micro ARM, UDID: 320018001251323238333733 | ||
| + | I: 2023-09-11 07:21:19.930 Modes: D-Star DMR YSF P25 NXDN M17 FM POCSAG AX.25 | ||
| + | |||
| + | [[File:ViewM17-Flash_success.png|604px]] | ||
| + | |||
| + | |||
| + | ===== FM Settings ===== | ||
| + | |||
| + | <syntaxhighlight lang="bash"> | ||
| + | https://github.com/g4klx/MMDVMHost/blob/master/MMDVM.ini | ||
| + | |||
| + | [FM] | ||
| + | Enable=0 | ||
| + | Callsign=BI7JTA | ||
| + | CallsignSpeed=20 | ||
| + | CallsignFrequency=1000 | ||
| + | CallsignTime=10 | ||
| + | CallsignHoldoff=0 | ||
| + | CallsignHighLevel=50 | ||
| + | CallsignLowLevel=20 | ||
| + | CallsignAtStart=1 | ||
| + | CallsignAtEnd=1 | ||
| + | CallsignAtLatch=0 | ||
| + | RFAck=K | ||
| + | ExtAck=N | ||
| + | AckSpeed=20 | ||
| + | AckFrequency=1750 | ||
| + | AckMinTime=4 | ||
| + | AckDelay=1000 | ||
| + | AckLevel=50 | ||
| + | # Timeout=180 | ||
| + | TimeoutLevel=80 | ||
| + | CTCSSFrequency=88.5 | ||
| + | CTCSSThreshold=30 | ||
| + | # CTCSSHighThreshold=30 | ||
| + | # CTCSSLowThreshold=20 | ||
| + | CTCSSLevel=20 | ||
| + | KerchunkTime=0 | ||
| + | HangTime=7 | ||
| + | AccessMode=1 | ||
| + | # LinkMode=1 to remove almost all of the logic control | ||
| + | LinkMode=0 | ||
| + | COSInvert=0 | ||
| + | NoiseSquelch=0 | ||
| + | SquelchThreshold=30 | ||
| + | # SquelchHighThreshold=30 | ||
| + | # SquelchLowThreshold=20 | ||
| + | RFAudioBoost=1 | ||
| + | MaxDevLevel=90 | ||
| + | ExtAudioBoost=1 | ||
| + | ModeHang=10 | ||
| + | |||
| + | [Modem] | ||
| + | Port=/dev/ttyAMA0 | ||
| + | ... | ||
| + | Protocol=uart | ||
| + | UARTPort=/dev/ttyAMA0 | ||
| + | UARTSpeed=115200 | ||
| + | ... | ||
| + | </syntaxhighlight> | ||
| + | |||
| + | If flash not success, check if enter Recovery Mode, | ||
| + | if not enter, run the script again till success. | ||
| + | If STILL Can't enter, use Manual method [Short BOOTO, Plug in Modem ] | ||
| + | |||
| + | [[File:Enter_Recovery_mode_V3F4.png|800px]] | ||
| + | |||
| + | Work in M17 mode, FM mode(in Expert page) | ||
| + | |||
| + | [[File:ViewM17-Flash_success.png|604px]] | ||
| + | |||
| + | Pi-Star Dashboard Support W0CHP version, Download: https://www.facebook.com/groups/371652781811739 | ||
[[File:M17.png|800px]] | [[File:M17.png|800px]] | ||
| Line 957: | Line 1,608: | ||
Facebook group get the firmware https://www.facebook.com/groups/443231163363290/search/?q=M17 | Facebook group get the firmware https://www.facebook.com/groups/443231163363290/search/?q=M17 | ||
You can also build the V3F4 firmware yourself, follow this WIKI: Repeater/Firmware | You can also build the V3F4 firmware yourself, follow this WIKI: Repeater/Firmware | ||
| + | Need help? https://www.bi7jta.org/wiki/index.php?title=Main_Page#Contact_me_Now | ||
| − | ==== Upgrade firmware ==== | + | <syntaxhighlight lang="bash"> |
| + | # Step by Setp,l for RPi3B/4B/ZeroW/BPiM2z | ||
| + | https://www.bi7jta.org/files/MMDVM_Firmware/repeater_HAT/set_GPIO_standalone_upgrade_repeater_FW_M17_12MHz.sh.txt | ||
| + | </syntaxhighlight> | ||
| + | |||
| + | ===== OS requirement ===== | ||
| + | In New firmware, you have to use new MMDVMHost(Pi-Star OS) | ||
| + | |||
| + | 2024.1.25 | ||
| + | If you use official PI-STAR (MW0MWZ), in order to detect the new V3F4 repeater firmware, you need to updete && upgrade your PI-STAR to v4.2.0 | ||
| + | |||
| + | Download the new IMG: https://www.pistar.uk/beta/ | ||
| + | Known issues: | ||
| + | 1, If you are using 460800bps the New FM network(MMDVM repeater V3F4), you must to add the follow settings to your | ||
| + | /etc/mmdvmhost | ||
| + | [Modem] | ||
| + | ... | ||
| + | Protocol=uart | ||
| + | UARTPort=/dev/ttyAMA0 | ||
| + | UARTSpeed=460800 | ||
| + | 2, Raspberry Pi ZeroW not have high speed BAUD 460800bps. | ||
| + | |||
| + | 2024.1.15 | ||
| + | J-STAR (Desktop PI-STAR, Recommend), customized by BI7JTA https://github.com/JTA-STAR/J-STAR | ||
| + | |||
| + | 2023.10 | ||
| + | You can also use WPSD PI-STAR: https://w0chp.radio/wpsd/ | ||
| + | |||
| + | |||
| + | YouTube demo: https://www.youtube.com/watch?v=VA8hKPlQOZQ&t=26s | ||
| + | |||
| + | If got exception , use Manual flash https://www.bi7jta.org/blog/mmdvm-2/manual-flash-firmware-fm-20201214-stable-86#scrollTop=0 | ||
| + | |||
| + | ==== How to Upgrade firmware ==== | ||
[[File:封面-UpgradeFW.jpg|800px]] | [[File:封面-UpgradeFW.jpg|800px]] | ||
| Line 964: | Line 1,649: | ||
Flash FM firmware, Copy the follow commands to ssh dialog: | Flash FM firmware, Copy the follow commands to ssh dialog: | ||
| − | + | ||
| − | + | New Firmware Version see the follow segment [M17 Mode FM build 2023060] | |
| − | + | ||
| − | + | YouTube demo: https://www.youtube.com/watch?v=VA8hKPlQOZQ&t=26s | |
| − | ./ | + | |
| − | + | ==== What is Recovery Mode? ==== | |
| + | If enter Recovery Mode(Flash firmware mode), you will see the follow. | ||
| + | |||
| + | [[File:Enter_Recovery_mode_V3F4.png|800px]] | ||
| + | |||
| + | |||
| + | Manual enter Recovery Mode (Right click your mouse to see the big photo): | ||
| + | |||
| + | [[File:Booto_flash_step_All.png|800px]] | ||
| + | |||
| + | ==== Troubleshooting Error ==== | ||
| + | ===== (0) How to add FM parameter in MW0MWZ PI-STAR ===== | ||
| + | Way 1th, use WebSSH and run "rpi-rw; sudo nano /etc/mmdvmhost " | ||
| − | + | Way 2sec, patch Dashboard to use full_edit_mmdvmhost | |
| + | sudo curl https://www.bi7jta.cn/files/AndyTaylorTweet/updateScripts/Patch_Add_FullEdit_MMDVMHost_to-MW0MWZ_PI-STAR_V_4.2.0.sh | sudo sh | ||
| + | [[File:Add-fulledit_mmdvmhost.png|800px]] | ||
| − | |||
| + | ===== (1) Forced it into Recovery Mode ===== | ||
If still can not flash successful, you can try the follow methods:</br> | If still can not flash successful, you can try the follow methods:</br> | ||
| − | + | ||
Step_1, Plug out 5V2A Power supply,</br> | Step_1, Plug out 5V2A Power supply,</br> | ||
Step_2, Short BOOTO and 3.3V Pins, then Power ON, let Repeater enter Recovery Mode, PWR, ACT, COS, DMR, POC light.</br> | Step_2, Short BOOTO and 3.3V Pins, then Power ON, let Repeater enter Recovery Mode, PWR, ACT, COS, DMR, POC light.</br> | ||
| Line 984: | Line 1,683: | ||
| − | ( | + | ===== (3) ST-Link tools ===== |
| − | + | Risky operation, Caution, do not short circuit +5V, +3.3V, you need to be familiar with the use of ST-LINK. | |
| − | |||
| − | |||
| − | |||
| − | |||
| − | |||
| − | |||
| − | |||
| − | |||
| − | |||
| − | [[File: | + | [[File:ST-LINK-Flash-V3F4.png|800px]] |
| − | |||
| − | |||
| − | |||
| − | |||
==== Compile firmware ==== | ==== Compile firmware ==== | ||
| − | The last version | + | The last version 20230606, </br> |
1, FM feature ,just support most of Motorola GMxx serial,</br> | 1, FM feature ,just support most of Motorola GMxx serial,</br> | ||
2, Fix the D-STAR mode data lost issue.</br> | 2, Fix the D-STAR mode data lost issue.</br> | ||
| + | 3, M17 supporrt .</br> | ||
| + | |||
| + | OS: Ubuntu for x86, Raspbian in Raspberry Pi ARM | ||
<syntaxhighlight lang="bash"> | <syntaxhighlight lang="bash"> | ||
| Line 1,011: | Line 1,700: | ||
rpi-rw | rpi-rw | ||
sudo git clone https://github.com/g4klx/MMDVM.git | sudo git clone https://github.com/g4klx/MMDVM.git | ||
| − | cd MMDVM | + | cd MMDVM |
| − | sudo | + | # for M17,FM, 115200bps default BAUD |
| − | # | + | sudo curl -OL https://www.bi7jta.org/files/MMDVM_Firmware/repeater_HAT/Config_115200_M17-Network.h |
| + | |||
| + | # for M17,FM, FM-Network, 460800bps default BAUD | ||
| + | # sudo curl -OL https://www.bi7jta.org/files/MMDVM_Firmware/repeater_HAT/Config_460800_FM-Network.h | ||
| + | |||
----------- Config.h start ------------ | ----------- Config.h start ------------ | ||
#define EXTERNAL_OSC 12000000 | #define EXTERNAL_OSC 12000000 | ||
| Line 1,025: | Line 1,718: | ||
sudo make clean | sudo make clean | ||
sudo make dvm | sudo make dvm | ||
| + | |||
| + | #If got error: | ||
| + | #make: arm-none-eabi-g++: No such file or directory | ||
| + | #make: *** [Makefile:308: obj_f4/AX25Demodulator.o] Error 127 | ||
| + | |||
| + | sudo apt install gcc-arm-none-eabi | ||
| + | |||
#Flash use Raspberry Pi GIPO | #Flash use Raspberry Pi GIPO | ||
| Line 1,032: | Line 1,732: | ||
sudo killall MMDVMHost >/dev/null 2>&1 ; | sudo killall MMDVMHost >/dev/null 2>&1 ; | ||
sudo ~/stm32flashV5 -v -w ~/mmdvm_f4.hex -R -i 20,-21,21:-20,-21,21 /dev/ttyAMA0; | sudo ~/stm32flashV5 -v -w ~/mmdvm_f4.hex -R -i 20,-21,21:-20,-21,21 /dev/ttyAMA0; | ||
| + | |||
| + | |||
| + | Success: | ||
| + | tail -100f /var/log/pi-star/MMDVM-2023-06-06.log | ||
| + | |||
| + | I: 2023-06-06 08:42:45.363 MMDVM protocol version: 2, description: MMDVM RB_STM32_DVM(446) 20221121 12.0000 MHz GitID #bf23a94 | ||
| + | I: 2023-06-06 08:42:45.363 CPU: ST-Micro ARM, UDID: 2A000A001550324239383220 | ||
| + | I: 2023-06-06 08:42:45.363 Modes: D-Star DMR YSF P25 NXDN M17 FM POCSAG AX.25 | ||
| + | |||
| + | Wrong with old Pi-Star: | ||
| + | I: 2023-06-06 08:39:17.857 MMDVM protocol version: 2, description:* | ||
| + | E: 2023-06-06 08:39:17.878 Received a NAK to the SET_CONFIG command from the modem | ||
| + | |||
</syntaxhighlight> | </syntaxhighlight> | ||
| − | |||
| − | |||
==== How to Debug RX and TX ==== | ==== How to Debug RX and TX ==== | ||
| Line 1,051: | Line 1,762: | ||
==== Adjust TX Level with SDR ==== | ==== Adjust TX Level with SDR ==== | ||
| − | + | YouTube demo preview : https://www.youtube.com/watch?v=C_1EC_w7hv0 | |
| − | |||
| − | + | SDR# lite (Old version just for view the spectrum) https://www.bi7jta.org/files/RTL-SDR/ | |
| − | + | RTL-SDR V1 , install Driver in Windows7/Windows10 (not test in Windows11) | |
| − | + | RTL-SDR V4, suggest use SDR++ https://www.bi7jta.org/files/RTL-SDR/V4/ | |
| − | [[File:RTL- | + | [[File:RTL-SDR-V4.png|800px]] |
| − | + | https://www.youtube.com/watch?v=OE9Pt9CseL0 | |
NOTE: FIRST YOU GOT THE BOARD ,KEEP THIS POT DEFAULT! | NOTE: FIRST YOU GOT THE BOARD ,KEEP THIS POT DEFAULT! | ||
| − | |||
The purpose is make repeater radio side generate a best digital spectrum. If you not have RTL-SDR,SDR#,Spectrum Analysis meter(such as CMU200), I not suggest to turn TX Potentiometer. | The purpose is make repeater radio side generate a best digital spectrum. If you not have RTL-SDR,SDR#,Spectrum Analysis meter(such as CMU200), I not suggest to turn TX Potentiometer. | ||
| Line 1,075: | Line 1,784: | ||
Step 2 : sudo pistar-mmdvmcal | Step 2 : sudo pistar-mmdvmcal | ||
| + | |||
| + | ===== 2.75KHz Deviation in RTL-SDR ===== | ||
[[File:Adjust-SDR_Spectrum-2Mb.JPG|800px]] | [[File:Adjust-SDR_Spectrum-2Mb.JPG|800px]] | ||
| − | + | ===== 2.75KHz Deviation in CMU200 testers ===== | |
| − | |||
[[File:Spectrum-CMU200.png |800px]] | [[File:Spectrum-CMU200.png |800px]] | ||
| Line 1,084: | Line 1,794: | ||
Click to view large image | Click to view large image | ||
| − | + | ===== 2.75KHz Deviation in SDRPlay ===== | |
SDRPlay + SDRuno adjust TXLevel | SDRPlay + SDRuno adjust TXLevel | ||
[[File:SDRPlayTXLevel.jpg|800px]] | [[File:SDRPlayTXLevel.jpg|800px]] | ||
| + | |||
| + | ===== 2.75KHz Deviation in IC9700 ===== | ||
| + | Shared by BD7EM | ||
| + | |||
| + | [[File:IC-9700-SDR-2.75KHz偏差Spectrum.png|800px]] | ||
| + | |||
| + | ===== DMR TX Data Test ===== | ||
| + | Press Shift + d, enter Mode: "DMR Simplex 1031 Hz Test Pattern (CC1 ID1 TG9)" | ||
| + | Press SPACE to PTT, | ||
| + | |||
Add TG:9 to your Receive list | Add TG:9 to your Receive list | ||
[[File:TG9-MMDVMCal.png|800px]] | [[File:TG9-MMDVMCal.png|800px]] | ||
| + | |||
| + | ===== Install RTL-SDR driver in Windows ===== | ||
| + | |||
| + | Driver download: https://www.bi7jta.org/files/RTL-SDR/ | ||
| + | |||
| + | [[File:RTL-SDR_Win10-ListAll.png|718px]] | ||
| + | |||
| + | [[File:RTL-SDR_Win10.png|757px]] | ||
| + | |||
| + | [[File:RTL-SDR_Win10-sys.png|733px]] | ||
| + | |||
| + | [[File:RTL-SDR_Win10-Afterinstall.png|564px]] | ||
==== Adjust RX Level with MMDVMCal ==== | ==== Adjust RX Level with MMDVMCal ==== | ||
| + | |||
| + | ===== The situation must adjust RXLevel ===== | ||
| + | |||
| + | Turn the RX pot clockwise until the CLIP LED turns off | ||
| + | |||
| + | [[File:RXLevel-overflow.png|800px]] | ||
| + | |||
| + | ===== BER too high possible cause by RXLevel ===== | ||
| + | |||
| + | Attention: BER too high also possible cause by Repeater frequency (such as offset 500Hz, 1KHz, not control in Pi-Star) | ||
| + | |||
NOTE: FIRST WHEN YOU GOT THE BOARD ,KEEP THIS POT DEFAULT! DO NOT ADJUST THE RV2 POT ON THE BOARD, UNLESS YOU HAVE RESEARCH ENOUGH KNOWNAGE ABOUT MMDVM PROJECT. | NOTE: FIRST WHEN YOU GOT THE BOARD ,KEEP THIS POT DEFAULT! DO NOT ADJUST THE RV2 POT ON THE BOARD, UNLESS YOU HAVE RESEARCH ENOUGH KNOWNAGE ABOUT MMDVM PROJECT. | ||
| Line 1,138: | Line 1,881: | ||
| − | The RV2 Default value, | + | ===== The TX Pot(TXLevel in hardware) Recommend value ===== |
| + | How to adjust your TXLevel (TX Pot) ? without RTL-SDR, SDR Play, Spectrum tester | ||
| + | |||
| + | [[File:BA7MPY-300D-TX增益电阻ALL.png|777px]] | ||
| + | |||
| + | Experiences values: (This method just as a reference , not All radios use the same value!!!) | ||
| + | GM338/CDM1250/GM340/GM3188/GM3688/CM200 : 8.12KΩ(Point1 to 2), (Point1 to 2), 1.92 KΩ(Point2 to Point3 GND) | ||
| + | GM950E/GM950: 5.95KΩ(Point1 to 2), 3.85KΩ(Point2 to Point3 GND) | ||
| + | SM120/SM50: 7.50KΩ(SM50) ,6.84KΩ(SM120) | ||
| + | GP88/GP300: | ||
| + | XPR4550 : 2.23~2.25KΩ(Point1 to 2), 7.43~7.75KΩ(Point2 to Point3 GND) | ||
| + | MTR2000 : 4.02KΩ(Point1 to 2), 5.98KΩ(Point2 to Point3 GND) | ||
| + | MCS2000 : | ||
| + | |||
| + | DR-1X : 2.92KΩ(Point1 to 2), 7.02KΩ(Point2 to Point3 GND) | ||
| + | FT-400D : 2.93KΩ(Point1 to 2), 7.11KΩ(Point2 to Point3 GND) | ||
| + | FT-400XD : 9.6KΩ(Point1 to 2), shared by (M0LLC)UK Version, how to adjust? 1, Use multimeter https://youtube.com/shorts/Rz8s7nVvI2Q?feature=share , 2, Use RTL-SDR/SDR Play/CMU200 https://www.bi7jta.org/wiki/index.php?title=Main_Page#Adjust_TX_Level_with_SDR | ||
| + | FT-300D : 8.397KΩ(Point1 to 2), | ||
| + | FT-7800/7900/8900/FT897d/FT891 : 3.44KΩ(Point1 to 2), 6.53KΩ(Point2 to Point3 GND) | ||
| + | |||
| + | TK-8185/8180: 3.32KΩ(Point1 to 2), 6.64KΩ(Point2 to Point3 GND) | ||
| + | TKR-850 Kenwood : ---- KΩ(Point1 to 2), | ||
| + | TKR-820 Kenwood : ---- (Need change VCO ,if not work in TX) | ||
| + | TM8200/TM8100 : 6.70KΩ(Point1 to 2), 3.67KΩ(Point2 to Point3 GND) | ||
| + | |||
| + | |||
| + | [[File:2.75KHz-TM8200.png|800px]] | ||
| + | |||
| + | ===== The RX Pot(RXLevel in hardware) Recommend value ===== | ||
| + | The purpose is get the low BER in Duplex mode | ||
| + | |||
| + | [[File:RX-Pot-GM3688.jpg|800px]] | ||
| + | |||
| + | What is the BEST value? | ||
| + | |||
| + | Only when the CLIP LED on the edge of status ON and Off, See this https://www.bi7jta.org/wiki/index.php?title=Main_Page#The_situation_must_adjust_RXLevel | ||
| + | |||
| + | Experiences values: (This method just as a reference , not All radios use the same value!!!) | ||
| + | GM338/CDM1250/GM340 : KΩ(Point1 to 2), KΩ(Point2 to Point3 GND) | ||
| + | GM3188/GM3688 : 34.1KΩ(Point1 to 2), KΩ(Point2 to Point3 GND) | ||
| + | GM950E/GM950 : KΩ(Point1 to 2), KΩ(Point2 to Point3 GND) | ||
| + | SM120/SM50 : KΩ(SM50) , KΩ(SM120) | ||
| + | GP88/GP300: | ||
| + | XPR4550 : KΩ(Point1 to 2), KΩ(Point2 to Point3 GND) | ||
| + | MTR2000 : KΩ(Point1 to 2), KΩ(Point2 to Point3 GND) | ||
| + | MCS2000 : | ||
| + | |||
| + | DR-1X : KΩ(Point1 to 2), KΩ(Point2 to Point3 GND) | ||
| + | FT-400D : KΩ(Point1 to 2), KΩ(Point2 to Point3 GND) | ||
| + | FT-300D : KΩ(Point1 to 2), | ||
| + | FT-7800/7900/8900/FT897d/FT891 : KΩ(Point1 to 2), KΩ(Point2 to Point3 GND) | ||
| + | |||
| + | TK-8185/8180: KΩ(Point1 to 2), KΩ(Point2 to Point3 GND) | ||
| + | TKR-850 Kenwood : ---- KΩ(Point1 to 2), | ||
| + | TKR-820 Kenwood : ---- (Need change VCO ,if not work in TX) | ||
| + | TM8200/TM8100 : KΩ(Point1 to 2), KΩ(Point2 to Point3 GND) | ||
| + | |||
| + | ===== The RV2 Default value ===== | ||
| + | 顺时针,电阻值值变大,信号量变小; | ||
| + | Clockwise, the resistance(R) value becomes larger(0~50KR-100KR) , the Signal quantity becomes smaller; | ||
| + | |||
[[File:RV2电位器_ALL.png|960px]] | [[File:RV2电位器_ALL.png|960px]] | ||
| Line 1,175: | Line 1,978: | ||
http://pi-star/admin/expert/edit_mmdvmhost.php | http://pi-star/admin/expert/edit_mmdvmhost.php | ||
| + | |||
| + | |||
| + | ==== Remote Control ==== | ||
| + | |||
| + | [[File:RemoteKill-遥毙RF.jpg|800px]] | ||
=== RadioCPS (Programming software), templates === | === RadioCPS (Programming software), templates === | ||
| Line 1,191: | Line 1,999: | ||
Config Radio demo: | Config Radio demo: | ||
| + | |||
| + | == Programming Cable DIY == | ||
| + | === GM338/CDM1250/CDM1550/GM340/GM350/GM360 === | ||
| + | |||
| + | [[File:GM300-USBtoTTL-Work.png|800px]] | ||
| + | |||
| + | Fixed: test in CP2102 , not CP2302, maybe work in PL2312, CH340, CH9102X chip. | ||
| + | |||
| + | === Tait TM8100 TM8100 === | ||
| + | |||
| + | [[File:TM8200_ProgrammingCable.jpg|800px]] | ||
| + | |||
| + | |||
| + | === MTR2000 Motorola === | ||
| + | |||
| + | [[File:MTR2000-Programming_cable_by_bi7jta.JPG|800px]] | ||
| + | |||
| + | |||
| + | === TKR850 TK8185 TK8180 Kenwood === | ||
| + | Coming soon | ||
| + | |||
| + | === GP88 GP3000 Motorola === | ||
| + | Coming soon | ||
| + | |||
| + | === FTM-400D/FTM-350D/FTM-100d DR-1X === | ||
| + | Coming soon | ||
| + | |||
| + | |||
| + | Buy one with MMDVM Repeater Modem : www.bi7jta.org/shop | ||
== Advanced Settings == | == Advanced Settings == | ||
| Line 1,237: | Line 2,074: | ||
=== Install NextionDriver for Model 8/Model 10 === | === Install NextionDriver for Model 8/Model 10 === | ||
| − | + | [[File:EnterSSH_(1).png|800px]] | |
| − | |||
| − | + | [[File:ModemTypeUSB.png|800px]] | |
| − | |||
| − | |||
| − | |||
| − | |||
| − | |||
<syntaxhighlight lang="bash"> | <syntaxhighlight lang="bash"> | ||
| − | # | + | # Uninstall first |
| − | + | sudo curl https://www.bi7jta.org/files/AndyTaylorTweet/updateScripts/Remove_NextionDriver_JP.sh | sudo sh | |
| − | |||
| − | |||
| − | |||
| − | |||
| − | |||
| − | |||
| − | |||
| − | |||
| − | |||
| − | |||
| − | sudo | ||
| − | sudo | ||
| − | # | + | # Install and reboot |
| − | sudo | + | sudo curl https://www.bi7jta.org/files/AndyTaylorTweet/updateScripts/Install_NextionDriver_JP.sh | sudo sh |
| − | sudo | ||
| − | |||
</syntaxhighlight> | </syntaxhighlight> | ||
| − | |||
| − | + | Double check your NextionDriver Config: /etc/mmdvmhost | |
| − | [ | + | <syntaxhighlight lang="bash"> |
| + | [General] | ||
| + | Callsign=BI7JTA | ||
| + | Id=7654321 | ||
| + | Timeout=240 | ||
| + | Duplex=1 | ||
| + | RFModeHang=300 | ||
| + | NetModeHang=300 | ||
| + | Display=Nextion | ||
| + | Daemon=1 | ||
| + | |||
| + | [Transparent Data] | ||
| + | Enable=1 | ||
| + | SendFrameType=1 | ||
| + | RemoteAddress=127.0.0.1 | ||
| + | RemotePort=40094 | ||
| + | LocalPort=40095 | ||
| − | + | [Nextion] | |
| + | Port=/dev/ttyNextionDriver | ||
| + | Brightness=50 | ||
| + | DisplayClock=1 | ||
| + | UTC=0 | ||
| + | ScreenLayout=4 | ||
| + | IdleBrightness=20 | ||
| − | + | [NextionDriver] | |
| − | + | Port=modem | |
| − | + | DataFilesPath=/usr/local/etc/ | |
| − | + | LogLevel=2 | |
| − | + | GroupsFile=groups.txt | |
| − | + | DMRidFile=stripped.csv | |
| + | #DMRidDelimiter=, | ||
| + | #DMRidId=1 | ||
| + | #DMRidCall=2 | ||
| + | #DMRidName=3 | ||
| + | #DMRidX1=4 | ||
| + | #DMRidX2=5 | ||
| + | #DMRidX3=7 | ||
| + | ShowModeStatus=0 | ||
| + | RemoveDim=0 | ||
| + | WaitForLan=0 | ||
| + | SleepWhenInactive=0 | ||
| + | Enable=1 | ||
| + | </syntaxhighlight> | ||
=== Download Nextion file === | === Download Nextion file === | ||
| Line 1,346: | Line 2,197: | ||
[[File:OLED-旋转180度_ALL.JPG|frameless|800px|]] | [[File:OLED-旋转180度_ALL.JPG|frameless|800px|]] | ||
| + | |||
| + | === HDMI Display for RPi3B/4B, BPiM2 === | ||
| + | |||
| + | Version: Modified from WPSD with HDMI Web browser UI, for Raspberry Pi 4B/3B/ZW | ||
| + | https://drive.google.com/drive/folders/1Ur2JOti9DobjBHYa9dAL5bbiNu8OD1sb?usp=sharing | ||
| + | |||
| + | For BPiM2u, BPiM2b Berry, BPiM2z | ||
| + | https://github.com/bi7jta/W0CHP-PiStar-ALL-BPiM2 | ||
| + | |||
| + | @see also https://www.bi7jta.org/wiki/index.php?title=Main_Page#Flash_Pi-Star_OS | ||
== Radio for MMDVM == | == Radio for MMDVM == | ||
Latest revision as of 17:07, 14 April 2024
Contents
- 1 Contact me Now
- 2 MMDVM'S Project information
- 3 MMDVM Setting guide
- 3.1 GPIO Definition
- 3.2 Raspberry Pi All Edition GIPO
- 3.3 Flash Pi-Star OS
- 3.4 Pi-Star OS for VisualBox(Win10,macOS)
- 3.5 Import config file
- 3.6 Dashboard Login
- 3.7 Config WiFi (to Network)
- 3.8 Config WiFi (with HDMI/Keyboard/Mouse)
- 3.9 Config Static Talkgroup (to DMR BM Server)
- 3.10 Analysis and download running logs
- 3.11 Analysis Pi-Star OS Boot logs
- 3.12 Radio Settings to MMDVM
- 3.13 Analysis Pi-Star OS Boot logs
- 3.14 How-to-enter-ssh
- 3.15 Simplex HOTSPOT
- 3.16 NanoPi NEO/Air HOTSPOT
- 3.17 Duplex HOTSPOT
- 3.18 Repeater Board
- 3.18.1 Pi-Star Settings
- 3.18.2 Very Important Process: Calibration Frequency Offset
- 3.18.3 Simplex and Repeater diagram (Motorola 16 Pins and 20 Pins)
- 3.18.4 V3F4 Pinout define
- 3.18.5 COS LED bright means RX and TX work (in Duplex/repeater mode)
- 3.18.6 FT-7900/7800/8900 YAESU
- 3.18.7 FT-817/991/857D
- 3.18.8 FTM-100D/FTM-350/FTM-400D
- 3.18.9 DR-1X YAESU
- 3.18.10 Yaesu / Vertex VX-5000
- 3.18.11 GM3188/GM3688/CM140/CM340
- 3.18.12 GM338-CDM1250-CDM1550-CDM750-MCX760
- 3.18.13 ICOM IC-208H
- 3.18.14 ICOM IC-2720/IC-2820
- 3.18.15 ICOM Id-880-HB9TUO
- 3.18.16 GM300/M120 Motorola
- 3.18.17 SM50/SM120
- 3.18.18 GM340/GM350/GM360
- 3.18.19 GM350 GM950E Hardware modify
- 3.18.20 GM950i Motorola
- 3.18.21 Pro5100 Motorola
- 3.18.22 Kenwood TK8180 TK8185
- 3.18.23 Kenwood TM-451E
- 3.18.24 Kenwood TM-D700
- 3.18.25 Kenwood TM-271
- 3.18.26 Kenwood TM-V71A
- 3.18.27 Kenwood TKR-820 TKR-720
- 3.18.28 Kenwood TKR-850 TKR-750
- 3.18.29 Kenwood Other
- 3.18.30 XPR4550/M8268/XPR5550e DMR serial radio
- 3.18.31 XPR 8300 MotoTRBO repeater
- 3.18.32 MTM5400 Motorola Tetra
- 3.18.33 XiR M3188/XiR M3688 DMR radio
- 3.18.34 Data radio FC302
- 3.18.35 MTR2000 Motorola
- 3.18.36 GM1200
- 3.18.37 MCS2000
- 3.18.38 Tait TM8100
- 3.18.39 Tait TM8200
- 3.18.40 Tait T855-T857-T858
- 3.18.41 Tait TB7100
- 3.18.42 Huawei E403 SU450C
- 3.18.43 TYT-TH9000
- 3.18.44 Hytera RD982/RD980
- 3.18.45 Hytera RD625
- 3.18.46 Other Radio not test
- 3.18.47 Recommend Radio for MMDVM G4KLX
- 3.18.48 RadioCPS DMR radio templates
- 3.18.49 FM Analog mode
- 3.18.50 FM Network 460800bps(Connect to Allstarlink)
- 3.18.51 M17 Mode FM 115200bps build 20230606
- 3.18.52 How to Upgrade firmware
- 3.18.53 What is Recovery Mode?
- 3.18.54 Troubleshooting Error
- 3.18.55 Compile firmware
- 3.18.56 How to Debug RX and TX
- 3.18.57 Adjust TX Level with SDR
- 3.18.58 Adjust RX Level with MMDVMCal
- 3.18.59 Adjust RSSI Potentiometer
- 3.18.60 TX/RX/RV2/RSSI Potentiometer Reference
- 3.18.61 Config TalkGroup WhiteList
- 3.18.62 Remote Control
- 3.19 RadioCPS (Programming software), templates
- 3.20 MMDVM_BAT(Battery inside)
- 4 Programming Cable DIY
- 5 Advanced Settings
- 6 Nextion and OLED display
- 7 Radio for MMDVM
- 8 Pager 439.9875MHz
- 9 MMDVDM Server/Reflector build
- 10 DVSwitch + USRP + FM
- 11 DVSwitch + Mumble FM
- 12 MMDVM + OpenWrt
- 13 AllStarLink
- 14 Raspberry Pi for MMDVM
- 15 Software download
Welcome to BI7JTA'Wiki for MMDVM.
Begin December 1, 2019, I will continue update this WIKI page instead of Google blog, I am working on MMDVM just for my hobby, I am happy to share my knowledge and resources about MMDVM open source project.
What I provide? https://www.bi7jta.org/shop

Youtube https://www.youtube.com/winters_huang

Contact me Now
 E-Mail    bi7jta@gail.com
 Facebook Message https://facebook.com/winters.cn
 Twitter  https://twitter.com/winters_cn
 YouTube  https://www.youtube.com/c/WintersHuang
 Telegram https://t.me/bi7jta
 WhatsApp https://wasap.my/+8613927458201
MMDVM'S Project information
What I Made

Listing: https://www.bi7jta.org/shop
Pi-Star for BPi-M2/M5
Project https://github.com/bi7jta/W0CHP-PiStar-ALL-BPiM2
Difference in Duplex Simplex
Blank ...
MMDVM Setting guide
GPIO Definition
Raspberry Pi BPi NanoPi

Nano NEO/AIR Pi:

Orange Pi

More detail: http://mmdvm.bi7jta.org/search/label/GPIO
Raspberry Pi All Edition GIPO

Flash Pi-Star OS
Flash SD card(TF card)tools
SD card/TF card, at least 8GC10+, Desktop 16G+

 Tool 1: balenaEtcher for macOS ,Windows , Not need format before flash.
 Download https://etcher.balena.io/
 Tool 2: Win32 disk image Writer for Windows (Need format SD Card before flash)
 SDFormatter: https://www.bi7jta.org/files/PiStarTools/SDFormatterv4.zip
 Win32 disk image Writer: https://www.bi7jta.org/files/PiStarTools/win32diskimager-1.0.0-install.zip
J-STAR with HDMI Desktop for Raspberry Pi
This project source from old W0CHP Dashboard, IMG Download for for Raspberry Pi 4B/3B (Recommend 4B2G+), add extension Allstarlink(SIP/IAX), DVSwitch, Pi-Star FM Netork connect to Allstarlink use USRP protocal(Need MMDVM Repeater kit from @BI7JTA) :Support Modes: D-Star DMR YSF P25 NXDN M17 FM POCSAG AX.25, FM-Network Download https://github.com/JTA-STAR/J-STAR/blob/main/README.md

J-STAR For BPiM2, BPiM2z
for BPiM2, 1G RAM, https://drive.google.com/drive/folders/1rdo-ubDx7-jWKAF7aBeiNfyVrr_WfYeD?usp=sharing
for BPiM2z, 512M RAM, https://drive.google.com/drive/folders/1_vt5qpS1pQ66oB9Amj4K3XLwUU7XTZ9u?usp=sharing

Github: https://github.com/bi7jta/W0CHP-PiStar-ALL-BPiM2
- Need help? contact me any time https://www.bi7jta.org/contactus
- If you buy with TF card from BI7JTA, please ignore this step
Official:MW0MWZ(UK)
 http://www.pistar.uk/downloads/
 https://www.pistar.uk/beta/
For Raspberry Pi 2/3/4 http://www.pistar.uk/downloads/

For NanoPi NEO/AIR ,Orange Pi http://www.pistar.uk/beta/

New:WPSD W0CHP(US)
 Support Modes: D-Star DMR YSF P25 NXDN M17 FM POCSAG AX.25, FM-Network
 NOTE: Have test not support Raspberry Pi ZeroW, will appear php error , web access appear 500 error. In Raspberry 2W work fine.
 https://w0chp.net/w0chp-pistar-dash/
Additional: for Repeater V3F4 New Firmware 460800bps
 2024.1.25
 If you use official PI-STAR (MW0MWZ), in order to detect the new V3F4 repeater firmware, you need to updete && upgrade your PI-STAR to v4.2.0
 Download the new IMG: https://www.pistar.uk/beta/
 Known issues:
 1, If you are using 460800bps the New FM network(MMDVM repeater V3F4), you must to add the follow settings to your
 /etc/mmdvmhost
 [Modem]
 ...
 Protocol=uart
 UARTPort=/dev/ttyAMA0
 UARTSpeed=460800
 2, Raspberry Pi ZeroW not have high speed BAUD 460800bps.
 2023.10
 You can also use WPSD PI-STAR: https://w0chp.radio/wpsd/
Pi-Star OS for VisualBox(Win10,macOS)
Download link
https://github.com/bi7jta/Lin-Star-ALL-VisualBox
Update method
Join develop
https://www.facebook.com/groups/v3f446
Import config file
https://www.bi7jta.org/files/UserManuals/ConfigTemplate/

- This config with BI7JTA callsign and DMRID , you have to register your ID and change your BM Password. See also https://www.bi7jta.org/wiki/index.php?title=Main_Page#Advanced_Settings
- This config will replace your WIFI SSID with my WIFI , you must change your WIFI config , before reboot .
Dashboard Login
http://pi-str or http://your_DHCP-IP-address
User: pi-star Pass: raspberry
Config WiFi (to Network)
Wi-Fi AP method:


Wi-Fi Builder
Visit: https://www.pistar.uk/wifi_builder.php

Config WiFi (with HDMI/Keyboard/Mouse)
Just for BPi-M2, RPi3B/4B with Desktop

Download BPiM2 IMG: https://github.com/bi7jta/W0CHP-PiStar-ALL-BPiM2
Config Static Talkgroup (to DMR BM Server)

Quickly steps:


Reference:
https://www.bi7jta.org/wiki/index.php?title=Main_Page#Set_Static_Talkgroups

See also Register RadioId
https://www.bi7jta.org/wiki/index.php?title=Main_Page#Register_DMRID
Analysis and download running logs
W0CHP Dashboard
http://pi-star//admin/download_all_logs.php

MW0MWZ Dashboard
http://pi-star/admin/download_modem_log.php (Change the "pi-star" to your DHCP IP Address, such as 192.168.x.x)
- (Change the domain "pi-star" to your DHCP IP Address, such as 192.168.1.100, if pi-star can't visit)
Download in the Menu page.

EMAIL logs file to bi7jta@gmail.com , or Facebook IM: https://www.facebook.com/winters.cn
Analysis Pi-Star OS Boot logs
Use HDMI display (Recommend 1920x1080p), suit Raspberry Pi All Model


Upload a video to Youtube and EMAIL to bi7jta@gmail.com
Reference:
RaspberryPiZW Normal running Status https://www.youtube.com/shorts/lnc6mvMI3zw
The Normal Status of MMDVM boot up https://www.youtube.com/shorts/8y6x1uYFovY
Radio Settings to MMDVM
DMR Mode
AnyTone878UV

PDF: https://www.bi7jta.org/files/UserManuals/Duplex%20hotspot%20User%27s%20Manual_v2020_12_23.pdf
Motorola XPR4550


P8668-M8268-XPR4550_cps software:
Hytera
TYT MD380
Baofeng DM5R
P25 Radios
https://www.bi7jta.org/files/radioCPS_MMDVM/xts3000/
D-Star Radios
ICOM9700-D-Star
Icom 9700 Terminal Mode With PiStar
Shared by KG5EIU https://davidcappello.com/2019/06/01/icom-9700-terminal-mode-with-pistar/
Shared by BU2ES https://pete-italk.com/2020/03/10/icom-ic-9700-mmdvm%E9%80%A3%E7%B5%90%E8%88%87%E8%A8%AD%E5%AE%9A%E6%95%99%E5%AD%B8%EF%BC%81/
YSF/C4FM Radios
NXDN Radios
https://www.bi7jta.org/files/radioCPS_MMDVM/NXDN/
Programming POCSAG/Pager

Programming method and Driver, software.
https://mmdvm.bi7jta.org/search/label/POCSAG
Analysis Pi-Star OS Boot logs
Use HDMI display (Recommend 1920x1080p), suit Raspberry Pi All Model
Upload a video to Youtube and EMAIL to bi7jta@gmail.com
Reference:
RaspberryPiZW Normal running Status https://www.youtube.com/shorts/lnc6mvMI3zw
The Normal Status of MMDVM boot up https://www.youtube.com/shorts/8y6x1uYFovY
How-to-enter-ssh
YouTube demo View from 1:16s https://www.youtube.com/watch?v=8cWUE_0eywQ&t=213s

Simplex HOTSPOT
Fast Config guide
 PDF Download https://www.bi7jta.org/files/UserManuals/
 Youtube Page  https://www.youtube.com/wintershuang
Firmware upgrade (Modem)
Use PI-STAR script
In order to support M17 feature, we need do the following. Step_1, Update firmware to the news 1.5.2+Step_2, Flash or update to WPSD dashboard, because Official Pi-Star MMDVMHost not update for 2 years. See more: https://www.bi7jta.org/wiki/index.php?title=Main_Page#Version:WPSD_W0CHP.28US.29

Use ssh script
 for Simplex hotspot , Raspberry Pi, BPi M2z,
 sudo curl https://raw.github.com/VR2VYE/MMDVM_HS_firmware/master/install_fw_duplex.sh | sudo sh
See more https://github.com/VR2VYE/MMDVM_HS_firmware
NanoPi NEO/Air HOTSPOT
Fast Config guide
 PDF Download https://www.bi7jta.org/files/UserManuals/
 Youtube Page  https://www.youtube.com/wintershuang
Firmware upgrade (Modem)
Use PI-STAR script
In order to support M17 feature, we need do the following. Step_1, Update firmware to the news 1.5.2+Step_2, Flash or update to WPSD dashboard, because Official Pi-Star MMDVMHost not update for 2 years. See more: https://www.bi7jta.org/wiki/index.php?title=Main_Page#Version:WPSD_W0CHP.28US.29

Use ssh script
 for NanoPi Simplex hotspot , NanoPi NEO, AIR,
 sudo curl https://raw.github.com/VR2VYE/MMDVM_HS_firmware/master/install_fw_nanohs.sh | sudo sh
See more https://github.com/VR2VYE/MMDVM_HS_firmware
Duplex HOTSPOT
PDF Download https://www.bi7jta.org/files/UserManuals/
Youtube Page https://www.youtube.com/wintershuang

Configure Static Talkgroup for DMR
See also:
https://www.bi7jta.org/wiki/index.php?title=Main_Page#Advanced_Settings
BER(Bit Error Rate) adjust
Enter expert mode:
http://pi-star/admin/expert/edit_mmdvmhost.php

- Config radio
Motorola Hytera big offset adjustment
Attention: Motorola ,Hytera DMR radios, as my experiences, there's always a big offset, And decoding is sensitive to frequency offset requirements (If you use AnyTone878UV, TYT MD380, or other China DMR radio, will better to decode DMR signal, and not big offset.
But no problem, you can adjust it easy, it is not he MMDVM problem, remember!

How to use MMDVMCal test frequency?

Firmware upgrade (Modem)
Use ssh script
for Duplex hotspot , Raspberry Pi, BPi M2z
sudo curl https://raw.github.com/VR2VYE/MMDVM_HS_firmware/master/install_fw_duplex.sh | sudo sh
or
sudo curl https://www.bi7jta.cn/files/MMDVM_Firmware/duplex_HAT/onekeyflash_RPi_fw_RPi_Duplex_VR2VYE_Ver1.6.1_CN.sh | sudo sh
If WPSD webSSH not work , use J-Star, PI-STAR webSSH, or Windows Powershell, Putty, MobaXterm ssh tools.
Login: ssh pi-star@192.168.0.1 (change to your IP address), Password: raspberry

See more https://github.com/VR2VYE/MMDVM_HS_firmware
Use WPSD command
 In order to support M17 feature, we need do the following.
 Step_1, Update firmware to the news 1.5.2+ , the new is 1.6.1
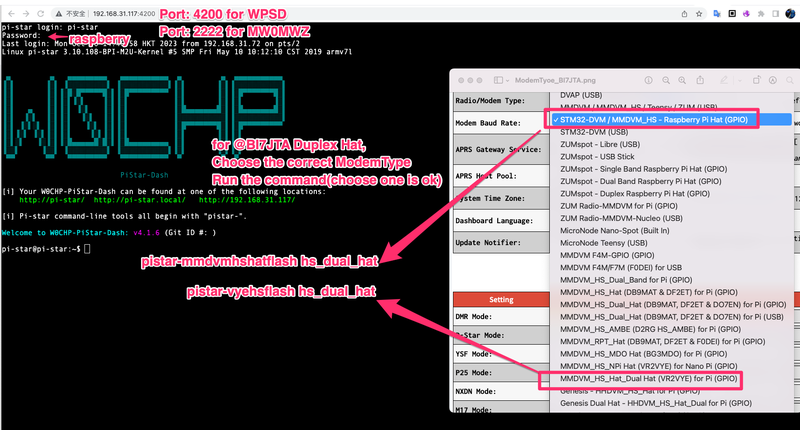

 Step_2, Flash or update to WPSD dashboard, because Official Pi-Star MMDVMHost not update for 2 years.
 See more: https://www.bi7jta.org/wiki/index.php?title=Main_Page#Version:WPSD_W0CHP.28US.29
Troubleshooting
Download full logs file: http://pi-star/admin/download_modem_log.php
Make a DMR channel programming screenshot
EMail to: bi7jta@gmail.com
Repeater Board
What is successful work status? The COS LED light.

Where I can find the demo video? YouTube: https://youtube.com/winters_huang
Pi-Star Settings
New firmware you must use new MMDVMHost(Pi-Star OS) ,2023.10 (Click to zoom in)

http://pi-star/admin/configure.php


Pi-Star Expert mode http://pi-star/admin/expert/edit_mmdvmhost.php
Key words: Accessory connector Pinouts ,connection diagram, Data Jack,
Very Important Process: Calibration Frequency Offset
 How to calibrate it? the frequency is shifted too far?
 1, Calibrate your RTL-SDR frequency, Config --> PPM, Send a FM signal and received by your RTL-SDR SDR#
 2, Adjust the PPM , let your RTL-SDR frequency same as your handset Radio,
 3, Send the same frequency from your GM338, GM340 repeater TX/RX radio , find out the offset, compare your Handset radio.
 4, Calibrate your GM338, GM340 repeater TX/RX radio frequency (Hz), use Professional software, if you can't find it, jump to 5th
 5, Write your handset radio frequency , suit your repeater radio.
Frequency Offset Calibrate software
TUNER Calibrate for GM338 CDM1550 GM340 GM350 GM360, and Motorola Analog mobile radio

Download: https://www.bi7jta.org/files/radioCalibrate-Frequency/
How to use Motorola Tuner and RSP Spectrum Analyser
The photo was shared by @ BG3MBB
Also go to YouTube search "Motorola tuner" . https://www.youtube.com/results?search_query=motorola+tuner

- You can also use RTL-SDR, SDRPlay, if you have adjustment your SDR PPM (frequency offset)


Repeater Bandwidth for test
Repeater board Sampling frequency bandwidth (MMDVM RX) :25KHz,
Your DMR/C4FM/P25/DSTAR/NXDN radio decode bandwidth (MMDVM TX):12.5KHz,
You will find it will easy to decode your radio RF signal in low BER%, but if your radio have big frequency offset, it will hard to decode voice and data in your Digital radio.
So Calibration Frequency Offset is very necessary , especially in old GM300 and Motorola digital radio.
In particular: For Motorola, Hytera DMR devices, frequency offset causes Repeater, Broken QSO to fail to open.
How to adjust Frequency offset? 1, Programming your DMR radio, 2, Programming your Repeater radio.
eg.
Adjust Motorola XPR4550 DMR radio, possible offset -500Hz, -400Hz, ....400Hz, 500Hz .... , till the BER% become low and perfect to QSO , listening

Simplex and Repeater diagram (Motorola 16 Pins and 20 Pins)
Duplex/Repeater Mode Connection


Simplex Mode(Hotspot) Connection


Accessory Diagram, use GM340 for example, also reference for all Motorola 16 Pins and 20 Pins radio

All I have adjust TXLevel before sent follow your order requirement, if you change your repeater , you can adjust yourself , see also the follow guide.

V3F4 Pinout define


COS LED bright means RX and TX work (in Duplex/repeater mode)

FT-7900/7800/8900 YAESU
(1) Connection definition

(2) Radio settings
The forwarding station (eg. ft-7900) is set to Rx 9600bps. Please refer to the manual for the operation process

FT-7800 User manual https://www.bi7jta.org/files/radioCPS/ft7800/FT7800R-User-Manual.pdf
(3) Pi-Star setting
Keep the TXInvert = 1, RXInvert = 0, if RX(the repeater side) can not decode any data , try RXInvert = 1

(4) Cases demo

FT-817/991/857D
HF Serial :FT-817/FT-991/FT-857D/FT-897
Reference FT-7800 FT-7900 DIN 6pins connector, SET PKT.SPD = 9600bps, default is 1200bps.

FT-857 TXInvert @IK1ZVK

User'S Guide Reference https://www.bi7jta.org/wiki/index.php?title=Main_Page#FT-7900.2F7800.2F8900_YAESU
FTM-100D/FTM-350/FTM-400D
Suit to FTM-100D FTM-300D FTM-350 FTM-400D, Connector MINI-PIN 10PIN


Set 9600bps

All Settings Sample

RXInvert settings in Expert mode (Just Experiences value , Not absolutely).

FTM-300D

 NOTE: See also 3.18.60.1 The TX Pot(TXLevel in hardware) Recommend value
 https://www.bi7jta.org/wiki/index.php?title=Main_Page#The_TX_Pot.28TXLevel_in_hardware.29_Recommend_value
DR-1X YAESU
Note: As we have test, NOT SUPPORT DR-2X,DR-1XFR, because YAESU have lock "DR-2X,DR-1XFR" and can not set RX 9600bps! Unless you can crack it.
Connection sample:

 Key settings:
 1, DR-1X, Data jack , set RX 9600bps
 2, DR-1X, FM mode,
 3, Pi-Star expert mode:  RX/TXInvert = 1
Data jack

Radio RX Setting bps: Packet Speed 9600bps

The cable made by me

Spectrum test video https://www.youtube.com/watch?v=xtx1nRY0LbU
Yaesu / Vertex VX-5000

https://www.repeater-builder.com/yvs/vxr-5000-repeater-mods.html
GM3188/GM3688/CM140/CM340
Programming your GM3688 GM3188 Xir M3688, RX TX the same settings.

Other information:

GM338-CDM1250-CDM1550-CDM750-MCX760
Youtube Tutorials https://www.youtube.com/wintershuang

Additional description:

Pinout: use the Center 16PINS
ICOM IC-208H
DATA Define

ICOM IC-2720/IC-2820

ICOM Id-880-HB9TUO
Cable same as FT-7800 https://www.bi7jta.org/shop/mmdvm-repeater-board-v3f4-dmr-ysf-d-star-nxdn-pocsag-fm-3#attr=289,287,117

GM300/M120 Motorola
GM300|M120 must fix frequency offset, and keep cool with fan!!!


Get Device Now: https://www.bi7jta.org/shop/mmdvm-repeater-board-v3f4-dmr-ysf-d-star-nxdn-pocsag-fm-3#attr=63,27
SM50/SM120
NOTE:
1, SM50/SM120 TXLevel not same as GM300/GM340,
2, SM50/SM120 Data pinout order not same as GM300/GM340,
3, SM50/SM120 not have flat RX pin define in default,


GM340/GM350/GM360


Check again. Debug mode recommend 25KHz. After you make your RX TX work , you can try 20KHz, 12.5KHz.

Double check settings and logs.

Radio CPS software and template
https://www.bi7jta.org/files/radioCPS/
Where I can get MMDVM modem with Technical Support? https://www.bi7jta.org/shop/mmdvm-repeater-board-v3f4-dmr-ysf-d-star-nxdn-pocsag-fm-3#attr=289,284,117
GM350 GM950E Hardware modify
 Shared by @DL9AM
 GM350_GM950_MODIFICATION_RXFLAT_TXFLAT_MMDVM

GM950i Motorola
This guide also suit GM950 and GM950e, notice that GM950e Pinout RX(Pin11) NOT available, you need a little change Inner-Circuit.
Some GM950E:@BG7RLY TXInvert=0, RXInvert=0 , use sudo pistar-mmdvmcal test "B", A/M, you can find the true value. Most use RXInvert=1


Warning!!! The GM950i TXLevel decode point not same as GM300 or GM3188/GM338, need adjust , reference the SDR# RTL-SDR, here is the Wrong Spectrum in 2.75KHz deviation.

GM950e Pinout RX(Pin11) NOT available, you need a little change Inner-Circuit.

Pro5100 Motorola
Programming settings reference
 GM338/CDM1250/CDM1550: https://www.bi7jta.org/wiki/index.php?title=Main_Page#GM338-CDM1250-CDM1550-CDM750-MCX760
 GM340/GM350/GM360: https://www.bi7jta.org/wiki/index.php?title=Main_Page#GM340.2FGM350.2FGM360
Experiences shared by Users in Facebook: https://www.facebook.com/groups/443231163363290/search/?q=Pro5100
Kenwood TK8180 TK8185


Programming template: https://www.bi7jta.org/files/radioCPS/tk8180-tk8185/
Get the device: https://www.bi7jta.org/shop/mmdvm-repeater-board-v3f4-dmr-ysf-d-star-nxdn-pocsag-fm-3
Facebook Group https://www.facebook.com/groups/v3f446
Kenwood TM-451E
.png)
Kenwood TM-D700


Kenwood TM-271

The data pinout same as FT-7800/ICOM-2720
Kenwood TM-V71A
Thank you @K0TX photo, from Google.

The data pinout same as FT-7800/ICOM-2720
Kenwood TKR-820 TKR-720
TKR-820's accessory connector pin assignment.also work for the TKR-720
Buy the cable with MMDVM Kit from BI7JTA'S HAM RADIO https://www.bi7jta.org/shop/mmdvm-repeater-board-v3f4-dmr-ysf-d-star-nxdn-pocsag-fm-3#attr=63,168,117


Pi-Star settings:
TXInvert=1,
RXInvert=1(UHF), 0:VHF
TXDelay=0
DMRDelay=300

TXLevel settings:
TXLevel=50 (follow BI7JTA product value)

Hardware modify:
CN2, PCB, R70, change the 47K to 1K
Source from http://www.repeater-builder.com/kenwood/tkr-820-to-scom-5k/tkr820-to-scom-5k.html
TKR820 Shared by @K7VE

PDF @K7VE : https://www.bi7jta.org/files/Repeater-Build-Ref/TKR850-TKR820-TKR720/tkr-820-dstar-MMDVM-repeaterBuilder.pdf
Thanks @W5ZIT @K7VE blog sharing.
More join and discuss in MMDVM Facebook Group: https://www.facebook.com/groups/v3f446/permalink/461736281512778
Kenwood TKR-850 TKR-750
 Pi-Star Expert settings: http://pi-star/admin/expert/edit_mmdvmhost.php
 TXInvert=1
 RXInvert=1 (UHF:1, VHF:0, just a experiences value, NOT absolute)
 PTTInvert=0
 TXDelay=300
 DMRDelay=7
Programming Channel settings:

TKR-850 repeater kit with soldering connector.

NOTE: @BI7JTA test not support FM , when use MMDVM/Duplex mode .

Checkout the Modem and Cable: https://www.bi7jta.org/shop/mmdvm-repeater-board-v3f4-dmr-ysf-d-star-nxdn-pocsag-fm-3#attr=63,27,117

Reference @VK4JLM: https://www.vk4jlm.com/index.php/projects/kenwood-tkr-850-multimode-repeater/
tkr-850-svc-man-revised https://www.repeater-builder.com/kenwood/pdfs/tkr-850-svc-man-revised.pdf
CPS Download : for KPG-91d v 2.13, DN, DC TKR-750, 850, 751, 851 (DN for Narrowband) http://www.k9rod.net/Commercial.html
Programming template provide by @BI7JTA https://www.bi7jta.org/files/radioCPS/tkr850tkr750/
Kenwood Other
TARPN -- Wiring Kenwood TK760, TK805D, TK862G etc. to NinoTNC

TK880 @SP8NTH share https://www.qsl.net/yo4tnv/Transceivers/Kenwood%20TK880/MMDVM%20cu%20TK880.pdf

Model | RX |TX Notes (Thanks for G4KLX Recommend http://mmdvm.bi7jta.org/search/label/MMDVM_repeater_radios)
TM-V71A/E WORK TX Has a timeout of Max 10 min and its impossible to change this.
TH-F7E WORK Cross (CT1HDC) (IW9GRL - Good reception but unstable BER 0.3~5% )
TKR-750 WORK WORK VK4JLM Tested DSTAR and DMR, interfaced via rear DB25
TKR-830 WORK WORK N4IRS Good receive and transmit Tested DMR only Needs internal jumper Doc to follow
TKR-850 WORK WORK VK4JLM Tested DSTAR and DMR, interfaced via rear DB25
TK-8180 WORK WORK KC9FQT Works great, used for the WF1RES repeater, used with rear DB25 port
TM-D710 Cross Cross Does not work for DMR! PTT works but the handheld does not decode. RX does not work at all. DSTAR not yet tested.(5B4AMD)
TM-D710G WORK WORK W4DHW - Currently being used on D-Star, DMR and P25 as higher power hotspot with STM32_DVM board. Works great! Set A-band or B-band to 9600 baud (external)
MMDVM Kit board https://www.bi7jta.org/shop/mmdvm-repeater-board-v3f4-dmr-ysf-d-star-nxdn-pocsag-fm-3#attr=63,27
XPR4550/M8268/XPR5550e DMR serial radio


RX/TX/PTT define/Timeout/Settings:


2.75KHz Deviation spectrum for Motorola XPR5550e
 ]]
]]
XPR 8300 MotoTRBO repeater
https://www.repeater-builder.com/motorola/xpr-cat/xpr-cat.html
Same as XPR4550
26-pin MAP Accessory Connector (XPR 8300) Signal Assignments
 XPR
 Pin	Wire
 Color	XPR Signal
 or Function	DE-9
 Pin	CAT
 Signal
 11	Brown	TX Audio Input (Analog only)	8	TX Audio #1 Output
 12	Red	Ground	1,6	Ground
 14	Orange	RX Audio Output (Analog only)	3	RX Audio #1 Input
 17	Yellow	External PTT Input (Analog only)	7	PTT #1 Output
 19	Green	Monitor Input (Analog only)	5	N/C
 20	Blue	Repeater Knockdown Input	4	Switch #1 Output
 21	Black	PL/Talkgroup Detect Output (COR)	2	COR #1 Input
 22	White	Football Knockdown Input	9	N/C
MTM5400 Motorola Tetra
Data Pinout to MMDVM V3F4@BI7JTA made

More: https://www.bi7jta.org/blog/mmdvm-2/79#scrollTop=0
XiR M3188/XiR M3688 DMR radio
 NOTE:
 Remove pin3 COS inhibit, otherwise will affect Duplex/Repeater transmit, experience shared by @DW7FJK Facebook Message https://www.facebook.com/100000176520522/
 The pinout and data define same as GM338/CDM1250/1550
 TXInvet=1, RXInvet=1, PTTInvert=0


Data radio FC302


MTR2000 Motorola
Share by @IW6BFE Arrio , verified by @BI7JTA
Pi-Star settings:
[Modem]
Port=/dev/ttyAMA0
TXInvert=0
RXInvert=0
PTTInvert=0
TXDelay=100
RXOffset=0
TXOffset=0
DMRDelay=165
RXLevel=50
TXLevel=50
RXDCOffset=0
TXDCOffset=0
RFLevel=100
CWIdTXLevel=50
D-StarTXLevel=50
DMRTXLevel=50
YSFTXLevel=50
P25TXLevel=50
NXDNTXLevel=50
POCSAGTXLevel=50
RSSIMappingFile=/usr/local/etc/RSSI.dat
Trace=0
Debug=0


#/usr/local/etc/RSSI.dat
# RSSI Default Values for MMDVM_HS
#
3545         -50
3295         -55
3059         -60
2834         -65
2598         -70
2362         -75
2132         -80
1896         -85
1707         -90
1470         -95
1239         -100
1003         -105
770          -110
483          -115
171          -120
24           -125
15           -130

Radio settings:
Reference "Programming an MTR2000 for the STM32-DVM-MTR2K"
http://ks-dmr.net/2019/04/30/programming-an-mtr2000-for-the-stm32-dvm-mtr2k/
Additional explanation


- Fix the automatic reboot issue when press DMR radio PTT ,sharing by @BG2FX


I have made a cable for MMDVM repeater board , you can checkout in my shop https://www.bi7jta.org/shop/mmdvm-repeater-board-v3f4-dmr-ysf-d-star-nxdn-pocsag-fm-3#attr=63,27,117

The programming cable work with Windows XP,

My MTR2000 programming data, software, https://www.bi7jta.org/files/radioCPS/mtr2000/

GM1200
Reference MCS2000
MCS2000
I have made the TX work(MCS20000 MMDVM board Transmit), RX work,


New Adapter connection Diagram

Pi-Star Expert mode settings (/etc/mmdvmhost) , change the IP address to your Local IP address
http://192.168.31.76/admin/expert/edit_mmdvmhost.php  [Pi-Star MW0MWZ]
http://192.168.2.8/admin/advanced/edit_mmdvmhost.php  [WPSD Dashboard]

[Modem]
Port=/dev/ttyAMA0
TXInvert=0
RXInvert=1
PTTInvert=0
TXDelay=100
RXOffset=0
TXOffset=0
DMRDelay=0
RXLevel=50
TXLevel=50
RXDCOffset=0
TXDCOffset=0
RFLevel=100
CWIdTXLevel=50
D-StarTXLevel=50
DMRTXLevel=50
YSFTXLevel=50
P25TXLevel=50
NXDNTXLevel=50
POCSAGTXLevel=50
RSSIMappingFile=/usr/local/etc/RSSI.dat
Trace=0
Debug=0
Have problem ? Download logs and sent to BI7JTA@GMAIL.com https://www.bi7jta.org/wiki/index.php?title=Main_Page#Analysis_and_download_running_logs
Get the kit https://www.bi7jta.org/shop/mmdvm-repeater-board-v3f4-dmr-ysf-d-star-nxdn-pocsag-fm-3
Tait TM8100
Full with DB15 connector to BI7JTA‘S MMDVM V3F4 pinout, thanks @F5UII

Shared by F5UII https://www.f5uii.net/en/tuning-mmdvm-dmr-tait-tm8100-tm8115/
Settings ,reference F5UII blog

Tait TM8200
Reference Tait TM8100
TM8100 series (TM8105, TM8110, TM8115…)
Tait T855-T857-T858

Tait TB7100


Reference:
http://www.lyonscomputer.com.au/Radio-Transceivers/Tait-Radios/TB7100-Repeater/TB7100-Repeater.html
Discuss: https://www.facebook.com/groups/v3f446/posts/992718208414580/
Huawei E403 SU450C

YouTube https://www.youtube.com/watch?v=YUmVefhvk3I
TYT-TH9000

Facebook https://www.facebook.com/groups/443231163363290/search/?q=TH9000
Hytera RD982/RD980


Facebook : https://www.facebook.com/groups/443231163363290/search/?q=RD982
Youtube https://www.youtube.com/watch?v=Fg1CkeIteBc&t=61s
Hytera RD625
Sharing by @Konzipiert von OE5PON
https://www.oevsv.at/export/oevsv/technik-folder/oe5_vm/bin/triplemode_repeater01.pdf
Other Radio not test
Hytera TR960
Thank you @BD4TLH provide the information, not ensure you can make it work.

GM660
MX800 (Motorola OEM)
https://youtube.com/shorts/jbQZoJQIOxE?feature=share

Also reference Allstarlink build https://wiki.w9cr.net/index.php/MX800
Recommend Radio for MMDVM G4KLX

https://mmdvm.bi7jta.org/search/label/MMDVM_repeater_radios
RadioCPS DMR radio templates
https://www.bi7jta.org/files/radioCPS/
https://www.bi7jta.org/files/radioCPS_MMDVM/
FM Analog mode
NOTE: FM Mode just work in Motorola GM338 GM340, GMxx,CDM1250, CDM1550 Serial now, NOT work in YAESU ,ICOM, KENWOOD.
In New firmware, you have to use new MMDVMHost(Pi-Star OS)
OS requirement
 Pi-Star for Repeater V3F4 New Firmware
 2024.1.25
 If you use official PI-STAR (MW0MWZ), in order to detect the new V3F4 repeater firmware, you need to updete && upgrade your PI-STAR to v4.2.0
 Download the new IMG: https://www.pistar.uk/beta/
 Known issues:
 1, If you are using 460800bps the New FM network(MMDVM repeater V3F4), you must to add the follow settings to your
 /etc/mmdvmhost
 [Modem]
 ...
 Protocol=uart
 UARTPort=/dev/ttyAMA0
 UARTSpeed=460800
 2, Raspberry Pi ZeroW not have high speed BAUD 460800bps.
 2024.1.15
 J-STAR (Desktop PI-STAR, Recommend), customized by BI7JTA https://github.com/JTA-STAR/J-STAR
 2023.10
 You can also use WPSD PI-STAR: https://w0chp.radio/wpsd/
From Pi-Star V4.1x and update to the new, the FM configuration and MMDVMHost have FM feature.
FM Settings
Modify your config in expert mode , such as:

Thanks for @BD4TGF provided test result.

More settings about FM mode and Discussion and Known Issue
If you Hardware is very old version ,maybe necessary flash the new firmware. See:
See also the next segment "Upgrade firmware"
Flash FM firmware, Copy the follow commands to ssh dialog:
New Firmware Version see the follow segment [M17 Mode FM build 2023060]
FM radio set : TalkAround Off, R:CTS 88.5Hz, T:CTS: 88.5Hz
YouTube: https://youtube.com/shorts/KGmUNapGirM?feature=share
The new FM settings: https://github.com/g4klx/MMDVMHost/blob/master/MMDVM.ini
[FM]
Enable=0
Callsign=BI7JTA
CallsignSpeed=20
CallsignFrequency=1000
CallsignTime=10
CallsignHoldoff=0
CallsignHighLevel=50
CallsignLowLevel=20
CallsignAtStart=1
CallsignAtEnd=1
CallsignAtLatch=0
RFAck=K
ExtAck=N
AckSpeed=20
AckFrequency=1750
AckMinTime=4
AckDelay=1000
AckLevel=50
# Timeout=180
TimeoutLevel=80
CTCSSFrequency=88.5
CTCSSThreshold=30
# CTCSSHighThreshold=30
# CTCSSLowThreshold=20
CTCSSLevel=20
KerchunkTime=0
HangTime=7
AccessMode=1
# LinkMode=1 to remove almost all of the logic control
LinkMode=0
COSInvert=0
NoiseSquelch=0
SquelchThreshold=30
# SquelchHighThreshold=30
# SquelchLowThreshold=20
RFAudioBoost=1
MaxDevLevel=90
ExtAudioBoost=1
ModeHang=10
FM Network 460800bps(Connect to Allstarlink)
 IMPORTANCE: In order to enable 460800bps speed, Recommend Flash Dashboard Custmized by me (Allstarlink, DVSwtich, MMDVMHost FM Network in one)
 https://www.bi7jta.org/wiki/index.php?title=Main_Page#Version:_BI7JTA-Dashboard_for_Raspberry_Pi_4B.2F3B
Flash Firmware in your webSSH
sudo curl https://www.bi7jta.org/files/MMDVM_Firmware/repeater_HAT/upgrade_repeater_FW_Network_12MHz_b20230726.sh | sudo sh
If you got flash error , try Manual flash: https://www.bi7jta.org/blog/mmdvm-2/manual-flash-firmware-fm-network-87
MMDVMHost full edit in W0CHP pi-star: http://pi-star/admin/advanced/fulledit_mmdvmhost.php
FM and FM Network Settings
https://github.com/g4klx/MMDVMHost/blob/master/MMDVM.ini

[Modem]
Port=/dev/ttyAMA0
...
Protocol=uart
UARTPort=/dev/ttyAMA0
UARTSpeed=460800
## 460800bps support FM Network , connect to Allstarlink, Analog Bridge(DVSwitch)
## WARNING: Just RPi 3B,4B,5B support 460800bps,
## RPi ZW, 2W, 2B, BananaPi M2z M2 NOT Support 460800bps, flash 115200bps firmware instead.
...

[FM Network]
Enable=1
Protocol=USRP
LocalAddress=0.0.0.0
LocalPort=12345    <Allstarlink, DVSwitch Analog_Bridge or AnalogReflector USRP TX Port >
GatewayAddress=192.168.31.118  <Allstarlink, DVSwitch Analog_Bridge or AnalogReflector USRP IP>
GatewayPort=12345  <Allstarlink, DVSwitch Analog_Bridge or AnalogReflector USRP RX Port >
PreEmphasis=1
DeEmphasis=1
TXAudioGain=1.0
RXAudioGain=1.0
ModeHang=20
Debug=1
LinkMode=1

[FM]
Enable=0
Callsign=BI7JTA
CallsignSpeed=20
CallsignFrequency=1000
CallsignTime=10
CallsignHoldoff=0
CallsignHighLevel=50
CallsignLowLevel=20
CallsignAtStart=1
CallsignAtEnd=1
CallsignAtLatch=0
RFAck=K
ExtAck=N
AckSpeed=20
AckFrequency=1750
AckMinTime=4
AckDelay=1000
AckLevel=50
# Timeout=180
TimeoutLevel=80
CTCSSFrequency=88.5
CTCSSThreshold=30
# CTCSSHighThreshold=30
# CTCSSLowThreshold=20
CTCSSLevel=20
KerchunkTime=0
HangTime=7
AccessMode=1
# LinkMode=1 to remove almost all of the logic control
LinkMode=0
COSInvert=0
NoiseSquelch=0
SquelchThreshold=30
# SquelchHighThreshold=30
# SquelchLowThreshold=20
RFAudioBoost=1
MaxDevLevel=90
ExtAudioBoost=1
ModeHang=10
OS requirement
In New firmware, you have to use new MMDVMHost(Pi-Star OS)
 2024.1.25
 If you use official PI-STAR (MW0MWZ), in order to detect the new V3F4 repeater firmware, you need to updete && upgrade your PI-STAR to v4.2.0
 Download the new IMG: https://www.pistar.uk/beta/
 Known issues:
 1, If you are using 460800bps the New FM network(MMDVM repeater V3F4), you must to add the follow settings to your
 /etc/mmdvmhost
 [Modem]
 ...
 Protocol=uart
 UARTPort=/dev/ttyAMA0
 UARTSpeed=460800
 2, Raspberry Pi ZeroW not have high speed BAUD 460800bps.
 2024.1.15
 J-STAR (Desktop PI-STAR, Recommend), customized by BI7JTA https://github.com/JTA-STAR/J-STAR
 2023.10
 You can also use WPSD PI-STAR: https://w0chp.radio/wpsd/
M17 Mode FM 115200bps build 20230606
PI-STAR 4.1.8+ ,4.2.0, WPSD, J-STAR with new MMDVMHost, just detect the new firmware Ver 2 FM Mode.
Flash Firmware in your webSSH
#for RPi3B/4B/ZeroW/BPiM2z
sudo curl https://www.bi7jta.org/files/MMDVM_Firmware/repeater_HAT/upgrade_repeater_FW_M17_12MHz_b20230606.sh | sudo sh
#for BPiM2u BPiM2b
sudo curl https://www.bi7jta.org/files/MMDVM_Firmware/repeater_HAT/upgrade_repeater_FW_M17_12MHz_BPiM2b_b20230606.sh | sudo shCheck flash success. View Logs: tail -100f /var/log/pi-star/MMDVM-2023-09-11.log D: 2023-09-11 07:21:16.116 Opening the MMDVM I: 2023-09-11 07:21:19.930 MMDVM protocol version: 2, description: MMDVM RB_STM32_DVM(446) 20221121 12.0000 MHz GitID #bf23a94 I: 2023-09-11 07:21:19.930 CPU: ST-Micro ARM, UDID: 320018001251323238333733 I: 2023-09-11 07:21:19.930 Modes: D-Star DMR YSF P25 NXDN M17 FM POCSAG AX.25

FM Settings
https://github.com/g4klx/MMDVMHost/blob/master/MMDVM.ini

[FM]
Enable=0
Callsign=BI7JTA
CallsignSpeed=20
CallsignFrequency=1000
CallsignTime=10
CallsignHoldoff=0
CallsignHighLevel=50
CallsignLowLevel=20
CallsignAtStart=1
CallsignAtEnd=1
CallsignAtLatch=0
RFAck=K
ExtAck=N
AckSpeed=20
AckFrequency=1750
AckMinTime=4
AckDelay=1000
AckLevel=50
# Timeout=180
TimeoutLevel=80
CTCSSFrequency=88.5
CTCSSThreshold=30
# CTCSSHighThreshold=30
# CTCSSLowThreshold=20
CTCSSLevel=20
KerchunkTime=0
HangTime=7
AccessMode=1
# LinkMode=1 to remove almost all of the logic control
LinkMode=0
COSInvert=0
NoiseSquelch=0
SquelchThreshold=30
# SquelchHighThreshold=30
# SquelchLowThreshold=20
RFAudioBoost=1
MaxDevLevel=90
ExtAudioBoost=1
ModeHang=10

[Modem]
Port=/dev/ttyAMA0
...
Protocol=uart
UARTPort=/dev/ttyAMA0
UARTSpeed=115200
...
If flash not success, check if enter Recovery Mode, if not enter, run the script again till success. If STILL Can't enter, use Manual method [Short BOOTO, Plug in Modem ]

Work in M17 mode, FM mode(in Expert page)
Pi-Star Dashboard Support W0CHP version, Download: https://www.facebook.com/groups/371652781811739

 Facebook group get the firmware https://www.facebook.com/groups/443231163363290/search/?q=M17
 You can also build the V3F4 firmware yourself, follow this WIKI: Repeater/Firmware
 Need help? https://www.bi7jta.org/wiki/index.php?title=Main_Page#Contact_me_Now
# Step by Setp,l for RPi3B/4B/ZeroW/BPiM2z
https://www.bi7jta.org/files/MMDVM_Firmware/repeater_HAT/set_GPIO_standalone_upgrade_repeater_FW_M17_12MHz.sh.txt
OS requirement
In New firmware, you have to use new MMDVMHost(Pi-Star OS)
 2024.1.25
 If you use official PI-STAR (MW0MWZ), in order to detect the new V3F4 repeater firmware, you need to updete && upgrade your PI-STAR to v4.2.0
 Download the new IMG: https://www.pistar.uk/beta/
 Known issues:
 1, If you are using 460800bps the New FM network(MMDVM repeater V3F4), you must to add the follow settings to your
 /etc/mmdvmhost
 [Modem]
 ...
 Protocol=uart
 UARTPort=/dev/ttyAMA0
 UARTSpeed=460800
 2, Raspberry Pi ZeroW not have high speed BAUD 460800bps.
 2024.1.15
 J-STAR (Desktop PI-STAR, Recommend), customized by BI7JTA https://github.com/JTA-STAR/J-STAR
 2023.10
 You can also use WPSD PI-STAR: https://w0chp.radio/wpsd/
YouTube demo: https://www.youtube.com/watch?v=VA8hKPlQOZQ&t=26s
If got exception , use Manual flash https://www.bi7jta.org/blog/mmdvm-2/manual-flash-firmware-fm-20201214-stable-86#scrollTop=0
How to Upgrade firmware

The new firmware will synchronous with FM mode firmware , just support V3F4, Clip STM32F446
Flash FM firmware, Copy the follow commands to ssh dialog:
New Firmware Version see the follow segment [M17 Mode FM build 2023060]
YouTube demo: https://www.youtube.com/watch?v=VA8hKPlQOZQ&t=26s
What is Recovery Mode?
If enter Recovery Mode(Flash firmware mode), you will see the follow.
Manual enter Recovery Mode (Right click your mouse to see the big photo):

Troubleshooting Error
(0) How to add FM parameter in MW0MWZ PI-STAR
Way 1th, use WebSSH and run "rpi-rw; sudo nano /etc/mmdvmhost "
Way 2sec, patch Dashboard to use full_edit_mmdvmhost
sudo curl https://www.bi7jta.cn/files/AndyTaylorTweet/updateScripts/Patch_Add_FullEdit_MMDVMHost_to-MW0MWZ_PI-STAR_V_4.2.0.sh | sudo sh

(1) Forced it into Recovery Mode
If still can not flash successful, you can try the follow methods:
Step_1, Plug out 5V2A Power supply,
Step_2, Short BOOTO and 3.3V Pins, then Power ON, let Repeater enter Recovery Mode, PWR, ACT, COS, DMR, POC light.
Step_3, execute ./v3f4_12MHz_flash.sh

(3) ST-Link tools
Risky operation, Caution, do not short circuit +5V, +3.3V, you need to be familiar with the use of ST-LINK.

Compile firmware
The last version 20230606,
1, FM feature ,just support most of Motorola GMxx serial,
2, Fix the D-STAR mode data lost issue.
3, M17 supporrt .
OS: Ubuntu for x86, Raspbian in Raspberry Pi ARM
#Pull code from G4KLX github
rpi-rw
sudo git clone https://github.com/g4klx/MMDVM.git
cd MMDVM
# for M17,FM, 115200bps default BAUD
sudo curl -OL https://www.bi7jta.org/files/MMDVM_Firmware/repeater_HAT/Config_115200_M17-Network.h

# for M17,FM, FM-Network, 460800bps default BAUD
# sudo curl -OL https://www.bi7jta.org/files/MMDVM_Firmware/repeater_HAT/Config_460800_FM-Network.h

----------- Config.h start ------------
#define EXTERNAL_OSC 12000000
#define STM32F4_NUCLEO_MORPHO_HEADER
----------- Config.h end  --------------

#Add STM32F4XX_Lib directory
git clone https://github.com/juribeparada/STM32F4XX_Lib.git

#Compile for STM32F446
sudo make clean
sudo make dvm

#If got error:
#make: arm-none-eabi-g++: No such file or directory
#make: *** [Makefile:308: obj_f4/AX25Demodulator.o] Error 127

sudo apt install gcc-arm-none-eabi


#Flash use Raspberry Pi GIPO
#Download stm32flashV5
sudo curl -OL https://www.bi7jta.org/files/fm-patch/firmware/stm32flashV5;

sudo killall MMDVMHost >/dev/null 2>&1 ;
sudo ~/stm32flashV5 -v -w ~/mmdvm_f4.hex  -R  -i 20,-21,21:-20,-21,21 /dev/ttyAMA0;


Success:
tail -100f /var/log/pi-star/MMDVM-2023-06-06.log

I: 2023-06-06 08:42:45.363 MMDVM protocol version: 2, description: MMDVM RB_STM32_DVM(446) 20221121 12.0000 MHz GitID #bf23a94
I: 2023-06-06 08:42:45.363 CPU: ST-Micro ARM, UDID: 2A000A001550324239383220
I: 2023-06-06 08:42:45.363 Modes: D-Star DMR YSF P25 NXDN M17 FM POCSAG AX.25

Wrong with old Pi-Star:
I: 2023-06-06 08:39:17.857 MMDVM protocol version: 2, description:*
E: 2023-06-06 08:39:17.878 Received a NAK to the SET_CONFIG command from the modem
How to Debug RX and TX
Debug TX and RX standalone, take DMR for example, first write 9 group contact to your DMR receive Talk group list , decode debug data.


Adjust TX Level with SDR
YouTube demo preview : https://www.youtube.com/watch?v=C_1EC_w7hv0
SDR# lite (Old version just for view the spectrum) https://www.bi7jta.org/files/RTL-SDR/
RTL-SDR V1 , install Driver in Windows7/Windows10 (not test in Windows11)
RTL-SDR V4, suggest use SDR++ https://www.bi7jta.org/files/RTL-SDR/V4/

https://www.youtube.com/watch?v=OE9Pt9CseL0
NOTE: FIRST YOU GOT THE BOARD ,KEEP THIS POT DEFAULT!
The purpose is make repeater radio side generate a best digital spectrum. If you not have RTL-SDR,SDR#,Spectrum Analysis meter(such as CMU200), I not suggest to turn TX Potentiometer.
Step 1 : http://pi-star:2222 , User: pi-star , Pass: raspberry
Step 2 : sudo pistar-mmdvmcal
2.75KHz Deviation in RTL-SDR

2.75KHz Deviation in CMU200 testers

Click to view large image
2.75KHz Deviation in SDRPlay
SDRPlay + SDRuno adjust TXLevel

2.75KHz Deviation in IC9700
Shared by BD7EM

DMR TX Data Test
 Press Shift + d, enter Mode: "DMR Simplex 1031 Hz Test Pattern (CC1 ID1 TG9)"
 Press SPACE to PTT,

 Add TG:9 to your Receive list

Install RTL-SDR driver in Windows
Driver download: https://www.bi7jta.org/files/RTL-SDR/


Adjust RX Level with MMDVMCal
The situation must adjust RXLevel
Turn the RX pot clockwise until the CLIP LED turns off

BER too high possible cause by RXLevel
Attention: BER too high also possible cause by Repeater frequency (such as offset 500Hz, 1KHz, not control in Pi-Star)
NOTE: FIRST WHEN YOU GOT THE BOARD ,KEEP THIS POT DEFAULT! DO NOT ADJUST THE RV2 POT ON THE BOARD, UNLESS YOU HAVE RESEARCH ENOUGH KNOWNAGE ABOUT MMDVM PROJECT.
The purpose is make repeater radio generate side receive a best digital spectrum. If your BER% verylow ( less than 0.5), I not suggest to trun RX Potentiometer.
Hight BER% also cause by the BIG OFFSET of your REPEATER RADIO , or your Digital RADIO, consider this reason first.
To get the best value for the RXLevel, enter SSH mode
Step 1 : http://pi-star:2222 , User: pi-star , Pass: raspberry
Step 2 : sudo pistar-mmdvmcal

RX side required value, I hope you can understand it1 ,Yes otherwise keep Default value
The test point:

10x Oscilloscope signal probe

1x Oscilloscope signal probe

Adjust RSSI Potentiometer
KEEP DEFAULT, UNLESS YOU HAVE RESEARCH ENOUGH KNOWNAGE ABOUT MMDVM PROJECT.
Youtube OH1E post a demo about RSSI adjustment.https://www.youtube.com/watch?v=DSWPLDOZk8s
TX/RX/RV2/RSSI Potentiometer Reference

The TX Pot(TXLevel in hardware) Recommend value
How to adjust your TXLevel (TX Pot) ? without RTL-SDR, SDR Play, Spectrum tester

 Experiences values: (This method just as a reference , not All radios use the same value!!!)
 GM338/CDM1250/GM340/GM3188/GM3688/CM200 : 8.12KΩ(Point1 to 2),  (Point1 to 2), 1.92 KΩ(Point2 to Point3 GND)
 GM950E/GM950: 5.95KΩ(Point1 to 2),  3.85KΩ(Point2 to Point3 GND)
 SM120/SM50: 7.50KΩ(SM50) ,6.84KΩ(SM120)
 GP88/GP300:
 XPR4550 : 2.23~2.25KΩ(Point1 to 2), 7.43~7.75KΩ(Point2 to Point3 GND)
 MTR2000 : 4.02KΩ(Point1 to 2), 5.98KΩ(Point2 to Point3 GND)
 MCS2000 :

 DR-1X   : 2.92KΩ(Point1 to 2),  7.02KΩ(Point2 to Point3 GND)
 FT-400D : 2.93KΩ(Point1 to 2),  7.11KΩ(Point2 to Point3 GND)
 FT-400XD : 9.6KΩ(Point1 to 2),  shared by (M0LLC)UK Version, how to adjust? 1, Use multimeter https://youtube.com/shorts/Rz8s7nVvI2Q?feature=share , 2, Use RTL-SDR/SDR Play/CMU200 https://www.bi7jta.org/wiki/index.php?title=Main_Page#Adjust_TX_Level_with_SDR
 FT-300D : 8.397KΩ(Point1 to 2),
 FT-7800/7900/8900/FT897d/FT891 : 3.44KΩ(Point1 to 2),  6.53KΩ(Point2 to Point3 GND)
 TK-8185/8180: 3.32KΩ(Point1 to 2),  6.64KΩ(Point2 to Point3 GND)
 TKR-850 Kenwood : ---- KΩ(Point1 to 2),
 TKR-820 Kenwood : ---- (Need change VCO ,if not work in TX)
 TM8200/TM8100  : 6.70KΩ(Point1 to 2),  3.67KΩ(Point2 to Point3 GND)

The RX Pot(RXLevel in hardware) Recommend value
The purpose is get the low BER in Duplex mode

What is the BEST value?
Only when the CLIP LED on the edge of status ON and Off, See this https://www.bi7jta.org/wiki/index.php?title=Main_Page#The_situation_must_adjust_RXLevel
 Experiences values: (This method just as a reference , not All radios use the same value!!!)
 GM338/CDM1250/GM340 :  KΩ(Point1 to 2),  KΩ(Point2 to Point3 GND)
 GM3188/GM3688 : 34.1KΩ(Point1 to 2),  KΩ(Point2 to Point3 GND)
 GM950E/GM950  :     KΩ(Point1 to 2),   KΩ(Point2 to Point3 GND)
 SM120/SM50    :     KΩ(SM50) , KΩ(SM120)
 GP88/GP300:
 XPR4550 :  KΩ(Point1 to 2),  KΩ(Point2 to Point3 GND)
 MTR2000 :  KΩ(Point1 to 2),  KΩ(Point2 to Point3 GND)
 MCS2000 :

 DR-1X   :  KΩ(Point1 to 2),   KΩ(Point2 to Point3 GND)
 FT-400D :  KΩ(Point1 to 2),   KΩ(Point2 to Point3 GND)
 FT-300D :  KΩ(Point1 to 2),
 FT-7800/7900/8900/FT897d/FT891 :  KΩ(Point1 to 2),   KΩ(Point2 to Point3 GND)
 TK-8185/8180:  KΩ(Point1 to 2),   KΩ(Point2 to Point3 GND)
 TKR-850 Kenwood : ---- KΩ(Point1 to 2),
 TKR-820 Kenwood : ---- (Need change VCO ,if not work in TX)
 TM8200/TM8100  :  KΩ(Point1 to 2),   KΩ(Point2 to Point3 GND)
The RV2 Default value
 顺时针,电阻值值变大,信号量变小;
 Clockwise, the resistance(R) value becomes larger(0~50KR-100KR) , the Signal quantity becomes smaller;

Sch

Config TalkGroup WhiteList
1, Add attribute "Slot1TGWhiteList", "Slot2TGWhiteList" to file /etc/mmdvmhost ,
Enter ssh mode http://pi-star:2222 or use PuTTY.exe
rpi-rw
sudo nano /etc/mmdvmhost
[DMR]
Enable=1
Beacons=0
BeaconInterval=60
BeaconDuration=3
ColorCode=1
SelfOnly=0
EmbeddedLCOnly=0
DumpTAData=1
# Prefixes=234,235
Slot1TGWhiteList=
Slot2TGWhiteList=
2, Edit TalkGroup WhiteList in Pi-Star dashboard
http://pi-star/admin/expert/edit_mmdvmhost.php
Remote Control

RadioCPS (Programming software), templates
https://www.bi7jta.org/files/radioCPS/
https://www.bi7jta.org/files/radioCPS_MMDVM/
MMDVM_BAT(Battery inside)

Config WiFi demo:
https://www.youtube.com/channel/UC6Us7z_gkxNKc0PcCuS7fYQ
Config Radio demo:
Programming Cable DIY
GM338/CDM1250/CDM1550/GM340/GM350/GM360

Fixed: test in CP2102 , not CP2302, maybe work in PL2312, CH340, CH9102X chip.
Tait TM8100 TM8100

MTR2000 Motorola
TKR850 TK8185 TK8180 Kenwood
Coming soon
GP88 GP3000 Motorola
Coming soon
FTM-400D/FTM-350D/FTM-100d DR-1X
Coming soon
Buy one with MMDVM Repeater Modem : www.bi7jta.org/shop
Advanced Settings
Register DMRID
https://www.radioid.net/register#! DMRID/NXDNID/RADIOID
Set Static Talkgroups
First, you must Register BM network https://brandmeister.network/?page=register ,then wait the BM WebMaster review, about 1 day.
Change hotspot default password(Must do). https://brandmeister.network/?page=profile


Second, set static talkgroup for your DMRID , support ESSID (the two number tail of your DMRID)
NOTE: The static talkgroup is closely related to your hotspot ESSID and BM Server!
Method 1: Config online

Duplex mode, demo link https://brandmeister.network/?page=rep-edit&id=460072322 ,
Simplex mode, demo link https://brandmeister.network/?page=hotspot-edit&id=4600724 ,
Explain:
rep-edit: Duplex repeater mode , can use TS1,TS2 the same time.
hotspot-edit: Simplex mode, just can use TS2,
460072322: 4600723 is my DMRID, 22 is my duplex hotspot ESSID, corresponding to my hotspot DMR ESSID item
Method 2: Config in your Pi-Star

Nextion and OLED display
Install NextionDriver for Model 8/Model 10
.png)

# Uninstall first
sudo curl https://www.bi7jta.org/files/AndyTaylorTweet/updateScripts/Remove_NextionDriver_JP.sh | sudo sh

# Install and reboot
sudo curl https://www.bi7jta.org/files/AndyTaylorTweet/updateScripts/Install_NextionDriver_JP.sh | sudo sh
Double check your NextionDriver Config: /etc/mmdvmhost
[General]
Callsign=BI7JTA
Id=7654321
Timeout=240
Duplex=1
RFModeHang=300
NetModeHang=300
Display=Nextion
Daemon=1


[Transparent Data]
Enable=1
SendFrameType=1
RemoteAddress=127.0.0.1
RemotePort=40094
LocalPort=40095

[Nextion]
Port=/dev/ttyNextionDriver
Brightness=50
DisplayClock=1
UTC=0
ScreenLayout=4
IdleBrightness=20

[NextionDriver]
Port=modem
DataFilesPath=/usr/local/etc/
LogLevel=2
GroupsFile=groups.txt
DMRidFile=stripped.csv
#DMRidDelimiter=,
#DMRidId=1
#DMRidCall=2
#DMRidName=3
#DMRidX1=4
#DMRidX2=5
#DMRidX3=7
ShowModeStatus=0
RemoveDim=0
WaitForLan=0
SleepWhenInactive=0
Enable=1
Download Nextion file
Download directly: https://www.bi7jta.org/files/MMDVM_Nextion/
More information: https://mmdvm.bi7jta.org/search/label/Nextion_firmware
T043: T Serial 4.3",
tft: bin file for flash,
hmi: source file for edit,
eg.
NX4827T043_Model 10-4.3inch_DPLX_Basic_v1.05.HMI
NX4827T043_Model 10-4.3inch_DPLX_Basic_v1.05.tft
Nextion to Duplex Hotspot
Nextion RX <---> TX HAT /USBtoTTL
Nextion TX <---> RX HAT /USBtoTTL
Nextion GND <---> GND HAT /USBtoTTL
Nextion 5V <---> 5V HAT /USBtoTTL

Nextion to Repeater V3F4

Nextion to Bluetooth Model

OLED Setting
New Version:


OLD Version: Enter expert mode http://pi-star/admin/expert/edit_mmdvmhost.php
![]()


HDMI Display for RPi3B/4B, BPiM2
 Version: Modified from WPSD with HDMI Web browser UI, for Raspberry Pi 4B/3B/ZW
 https://drive.google.com/drive/folders/1Ur2JOti9DobjBHYa9dAL5bbiNu8OD1sb?usp=sharing
 For BPiM2u, BPiM2b Berry, BPiM2z
 https://github.com/bi7jta/W0CHP-PiStar-ALL-BPiM2
@see also https://www.bi7jta.org/wiki/index.php?title=Main_Page#Flash_Pi-Star_OS
Radio for MMDVM
AnyTone-878
OpenGD77
TYT-MD380-tools
TYT-MD760/GD77-MMDVM-HOTSPOT
Pager 439.9875MHz
Software download
Pager ID programming software, the newest is V3.0.9,
Support Windows XP, Windows 7, Windows 10 ,Windows 11
Programming adapter use CH340 Chip
https://www.bi7jta.org/files/POCSAG/ProgrammerV3.0.9_2020_CH340.zip
Driver for Windows 11: https://www.bi7jta.org/files/POCSAG/Driver-for-Win11-CH341SER.zip
Programming adapter use Pagerid Chip (Old USB adapter)
https://www.bi7jta.org/files/POCSAG/Programmer_x64x32.zip
Multi-language
Software for Multi-language character database: Chinese, Korean, Japanese,
Settings:
Write your RIC and S/N ,frequency
See also my Google blogger: https://mmdvm.bi7jta.org/search/label/Pager
MMDVDM Server/Reflector build
freeDMR
FreeDMR https://gitlab.hacknix.net/hacknix/FreeDMR/-/wikis/Installing-using-Docker-(recommended!)
- Make sure this script will delete your exists Docker service!!!!
Why use freeDMR https://www.freedmr.uk/index.php/why-use-freedmr/
Install without Docker https://github.com/hp3icc/Easy-FreeDMR-SERVER-Install
Xlxd for DMR/D-Star
DMR reflector/D-Star reflector in one https://github.com/bi7jta/XLX_CN
How to create an XLX_XRF D-Star Reflector https://n5amd.com/digital-radio-how-tos/create-xlx-xrf-d-star-reflector/
YSF/C4FM reflector
How to Creating a YSFReflector http://ks0lnk.net/?page_id=2968
P25 NXDN Ref Dashboard
P25 NXDN Ref Dashboard https://github.com/bi7jta/MMDVM-Install_RPT_N4IRS/tree/master/P25/P25Reflector-Dashboard
HBLink Link build DMR server
Private BM: https://github.com/n0mjs710/hblink3
Video https://www.chrishoodblog.com/make-your-own-dmr-server/
DMR Master Server Pt1 Deploy new server https://www.youtube.com/watch?v=A6-a8DaKPCQ
DMR Master Server Pt2 Install packages HBlink https://www.youtube.com/watch?v=LsqdO0xRjoQ
DMR Master Server Pt3 Configure HBlink https://www.youtube.com/watch?v=oXRCW-5JMws
Docker CE https://yeasy.gitbooks.io/docker_practice/install/raspberry-pi.html
DVSwitch + USRP
DVSwitch_install http://dvswitch.org/DVSwitch_install.pdf
USRP_Tetra_Bridge
https://github.com/dg1yiq/USRP_Tetra_Bridge
AMBE Digital Voice Transcoding Server
How to build a Digital Voice Transcoding Server with AMBE https://n5amd.com/digital-radio-how-tos/build-digital-voice-transcoding-server/?fbclid=IwAR2KoV7n7jHE8olO1c0Jv6xKRCS4UXOZSF3kH7tks8vfiKUjRRL1NtQuQc4
mmdvm svxlink
mmdvm_svxlink-1.pdf https://www.do0tpb.de/app/download/20307140/mmdvm_svxlink-1.pdf
DVSwitch + USRP + FM
DS5QDR Raspberry Pi
https://ds5qdr-dv.tistory.com/417

https://github.com/bi7jta/USRP-for-Raspberrypi

USRP_Client Python open source
https://github.com/bi7jta/USRP_Client
DVSwitch + Mumble FM
rpi-murmur https://github.com/ckulka/rpi-murmur
MMDVM + OpenWrt
 BD7MQB https://github.com/lazywalker/ostar MiWifi
 BG4TGO https://github.com/BG4TGO/Ostar OLED not in Master
AllStarLink
Raspberry Pi for MMDVM
Install Desktop for Pi-Star and use HDMI output
Preview:
Setp by setp:
Support RPi 3B/4B, BPi-M2u,M5, 1G RAM, 16G SDcard
 login ssh mode, http://pi-star:2222 ,or Putty.exe | OSX/Win10 PowerShell :ssh pi-star@pi-star (change @pi-star to your IP address)
 Login :pi-star, pass: raspberry
 run:
 rpi-rw;
 sudo apt-get update && sudo apt-get -y dist-upgrade #
 sudo apt-get install --no-install-recommends xserver-xorg -y #
 sudo apt-get install --no-install-recommends xinit -y #
 sudo apt-get install raspberrypi-ui-mods rpi-chromium-mods #for RPi && BPi
 #to boot into the desktop UI. If you prefer to boot into the desktop permanently: Run

 sudo raspi-config
 #Select System Options
 #Choose Boot/Auto Login
 #Select Desktop or Desktop Autologin depending on preference
 #Select Finish, then Reboot when prompted
 #Here is for Raspbian OS Linux11 AMD64/x86 in visualBox,not for ARM64, RPi, BPi
 #sudo apt install -y kde-standard #auto login not need Run sudo raspi-config
Reference: https://www.makeuseof.com/how-to-install-a-desktop-on-raspberry-pi-os-lite/
Software download
RTL-SDR Lite for MMDVM
Purpose: Adjust TX Level with SDR Lite version run directly. SDR# lite (Old version just for view the spectrum)
https://www.bi7jta.org/files/RTL-SDR/
How to install? Copy to C:\tools ---> Install Driver ---> Run SDRSharp.exe
 rpi-rw;
 sudo rm -rf STM32F10X_Lib.zip;
 sudo rm -rf STM32F10X_Lib;
 sudo rm -rf nano_hotspot_fw_1.5.2.bin
 sudo rm -rf onekeyflash_fw_nano_withGPIO_fix.sh
 curl -OL https://www.bi7jta.org/files/MMDVM_Firmware/BNWPI_Duplex/onekeyflash_fw_nano_BNWPI_Duplex.sh;
 curl -OL https://www.bi7jta.org/files/MMDVM_Firmware/BNWPI_Duplex/mmdvm_hs_dual_hat_fw_v1.5.2.bin;
 curl -OL https://www.bi7jta.org/files/MMDVM_Firmware/BNWPI_Duplex/STM32F10X_Lib.zip;
 sudo unzip STM32F10X_Lib.zip;
 sudo chmod +x ./STM32F10X_Lib/utils/rpi32/stm32flash;
 sudo chmod +x onekeyflash_fw_nano_BNWPI_Duplex.sh;
 sudo ./onekeyflash_fw_nano_BNWPI_Duplex.sh;
 echo "done"